Pages

Tuesday, March 25, 2014

March Practical Scrappers Blog Hop Giveaway!

Hello everyone, and happy Tuesday.

I hope you enjoyed the Practical Scrappers March Scrap Your Stash blog hop as much as I did.  As promised, today a winner was chosen using random.org, and #4 was the winner! Scrolling down to the 4th comment (my replies not included), the winner of the $20 e-gift certificate to Two Peas in a Bucket is:

TeenaBugg38


Congratulations TeenaBugg38!  Please email me at majkenmarie at yahoo dot com to claim your e-gift certificate!  You have until midnight Central time on Friday, March 28, 2014 to claim your prize.

Thank you to all who participated!  The next SYS blog hop is scheduled for April 18th and will be focused around Easter/spring theme.  Already thinking what I want to do!

Don't forget to see my latest page (my son is the goofy one highlighted): "That Moment We  Take Your Picture".

Gooey, chocolaty goodness,
Majken

Monday, March 24, 2014

That Moment We Take Your Picture...

Hi everyone!  Happy Monday!  Spring has finally sprung in the Houston area, although it's a little cooler than we're used to.  While my sinuses may not be happy, I still am!

Today I wanted to share a layout I made about my son, Paxton.  Have I mentioned he's a MESS?  Lol...in a good way, of course.  Well, my husband was hanging out with Paxton downstairs while Paxton was playing with a balloon, and my husband wanted to take Pax's picture.  This is what happened....and I decided it would make the perfect layout - blurry photos and all!  And I recently got my new Portobello Scrapbook Circle kit, so the two met!


Even though the kit is very boy-friendly, I was struggling with the papers.  Then I realized it was probably because I wanted to pair two sides of a single sheet of paper.  Do you ever have that problem??  To get around it, I cut out the grid part from the B side of this sheet of Basic Grey's Capture "Who What When":


And flipped it over so that the grid was now outlined by the red hexagon paper.  I matted the grid paper with a thin mat of CTMH Pacifica Blue cardstock to ensure the cut wouldn't show through, plus to make it pop a bit more.  I liked the triangle paper, so I used a full strip of that to mat my photos. 

Once the right side of my layout was decided, I wanted to do something additional with the grid paper.  I found the hexagon mask that came with a previous Scrapbook Circle kit and used it to ink some hexagons in Pacifica ink.  I layered the green number paper, the gray star paper, a strip of Pacifica cardstock stamped with a triangle pattern (from yet another Scrapbook Circle kit), and one of the journaling cards.  I sewed along the strip using red thread.


I also wanted to incorporate the larger triangle paper, so I cut out three large triangles using my Cricut and CTMH Art Philosophy cartridge. I cut shallow triangles out from the longest edge to make the "Star Trek"-looking symbols.  I layered them and sewed down the middle.  I also used one of the triangle cut-outs in the top right of the layout.  :)


The title was next.  I cut the "moment" and "photo" using my Cameo and Pacifica cardstock and used the alpha stickers that came with the kit.


Some final embellishments using stickers and a journaling card (pocketed behind the photos) completed the layout.


Do you have any blurry photos you would consider using in a layout?  If so, I'd love to see. I enjoyed creating this one, even with the silly imperfections.  

Have a great week, and stay tuned tomorrow for the giveaway winner from the March Practical Scrappers blog hop!  

Scrappy, chocolate wishes,
Majken

Thursday, March 20, 2014

Giveaway! {Paradise} - A Practical Scrappers Scrap Your Stash Blog Hop

Hello and welcome to the Practical Scrappers "scrap your stash" blog hop!!  You should have arrived here from Patty Selah's site (her cards were lovely!).  How about a $20 GIVEAWAY to keep the fun going?  Check out my tropical project and learn more about it at the end of this post.

Today I'm sharing my "Paradise" layout highlighting some photos from a family trip a few years ago.  I used some Bo Bunny "Barefoot & Bliss" stash I saved because the colors just POP - they're gorgeous!  They also go perfectly with tropical and water photos.  I think they also do not need a lot of embellishing, so I kept my layout simple...what do you think?


I started off with my CTMH Outdoor Denim cardstock base, and I used the Bo Bunny hibiscus patterned paper as the main background.  To add dimension, I created a "header" above it.


I started the header with a 1.5" x 9.5" strip of CTMH Lagoon cardstock, and I cut along the full strip with my Martha Stewart fringe scissors.  Above that, I layered a thin strip of the hibiscus paper and a scalloped strip of misted white cardstock.  I stamped the "paradise" definition on the left and adhered it all together.  I faux stitched in white above the header, and I stamped and fussy cut some flowers to layer on the right-hand side.

I layered my two photos over the hexagon patterned paper, distressing the edges, and then layering over CTMH Outdoor Denim cardstock.


I balanced the layout with a footer on the right hand side using a scalloped strip of white cardstock misted with Juniper reinker, which I adhered and did the faux stitching in white below.  I journaled on grid paper stamped 2nd generation with a hibiscus flower stamp, inked the edges, and adhered onto the hexagon paper and Lagoon cardstock.  


I finished the layout adding a button and some raffia palm tied with ribbon to the footer, and adding some gems above the header.  I hope you felt tropical on today's blog hop!


***Giveaway!***
  
I'm giving away one $20 e-gift certificate to the Two Peas in a Bucket online store!

All you have to do is:
  1. Become a member of my blog with Google Friend Connect or Bloglovin AND
  2. Leave a comment on this blog post - would love if you share your favorite spring memory or tradition :)
Easy, peasy!  You have until Monday, March 24, 2014 at 9am CT to enter for your chance to win. International entries are welcome. I will randomly choose one lucky winner and announce it here on my blog on Tuesday, March 25, 2014. Good luck, and thanks for visiting!


Now head over to the very talented Jennifer Haggerty's blog for your next stop.  Isn't her layout FUN?? Those glasses are a hoot!

Tuesday, March 11, 2014

Card Sketches with Practical Scrappers

Hello everyone!  I hope you are enjoying your day today.  I've been so busy scrapping that I have fallen a little behind in my card-making.  BUT, I am catching up because of the sketches from Practical Scrappers and a few others.  

I wanted to share two cards with you based on sketches for Practical Scrappers, and please go check out all the wonderful creations from the other talented Practical Scrappers designers!

My first card is based on a sketch by Christine Meyer.  The sketch:


I love the sketch!  And it made me really eager for spring (more than I already was!).  I opted to do a 5" x 7" card and use some Simple Stories stash of 100 Days of Summer "Simple Pleasures" paper.  Doesn't it make you want the warm days of early summer to get here?


I layered the flower pattern on CTMH Cranberry cardstock.  On top of that is white cardstock edged with CTMH Juniper ink.  I outlined the white cardstock with machine stitching in red.  The butterflies were created on my Cricut Imagine using the CTMH Art Philosophy cartridge...Butterfly #1 and the layer.  I alternated the base and layer for the butterflies and left a few of the smaller ones unlayered.


I finished the card with the sentiment, some small hearts stamped with Juniper ink, and some red gems.  I purposely didn't adhere the wings or wing layers down so they'd add some dimension.


My second card is based on a card by Patty Grau Selah.  Here's the sketch:


And here's my rendition (I chose to do another 5" x 7" card):


I used My Mind's Eye Now & Then "Milo" for this card.  It's such a fresh line!  I started by layering the silver chevron pattern on CTMH Outdoor Denim cardstock and stitching in dark blue along the bottom silver chevron.

I layered the N&T Inspired Forest paper onto Outdoor Denim cardstock and then cut a circle out of the middle.  I layered some old fibers I had around the edge of the circle.  


To finish the card, I cut a few banners, outlined with Outdoor Denim ink and layered underneath the center.  I fussycut several flowers out (one from the paper and the rest stamped on the back).  After I adhered them down (one with a pop dot to create dimension), I put some N&T Enamel Dots in the centers of the flowers.  The "Thanks" sticker completed the card.

I hope you enjoyed the cards, and we'd love to see your version of these sketches, so don't be shy in sharing them.

See you soon...and until then, chocolate dreams!

Majken Pullin


Tuesday, March 4, 2014

Sweet You Layout

Happy Tuesday everyone!

Don't you just love a good sketch?  I do!!  Isn't this sketch by Christine Meyer wonderful?


I wanted to do a two-page layout with it, so I decided to flip it 90 degrees and stretch it...diagonally!  And here's the end result (which you can also see on the Practical Scrappers blog, along with some other fabulous renditions of the sketch in-use):


I have a bottomless My Mind's Eye paper stash going, so I dug into that to highlight me and my daughter meeting my niece for the first time.  She is soooo cute!  Her chubby cheeks are truly a beautiful sight.  I'm not even biased.  ;)

I cut circles in many sizes with my Cameo using MME Lime Twist "Happy Go Lucky" collection (love it so much!), and inked all the edges with CTMH Outdoor Denim ink.  I cut four 3/4" strips of the dark blue patterned paper to put along the edges, and I machine stitched in pink thread zigzags.  The bottom had a 1/4" strip of the light blue paper, and I cut circles from the purple paper (from the 6x6 paper pad), inked them, and cut them in half to create a scallop border to help anchor the bottom.


I used the stickers to create the "Sweet You" title, along with some gems.


I matted the photos with squares and rectangles rounded at opposite corners.  I completed the layout using some butterfly stickers, buttons, twine, and enamel dots.


I also stamped with a circle stamp "Smile Giggle Laugh" from the CTMH D1217 Free Spirit set (retired) in pink ink around a few of the circle edges.  You can see one of them below.  I also plan to journal in the large flower circle you see here, but I needed to edit my text, so I ran out of time to include that in the photo.


I hope you enjoyed this 2-page rendition of Christine's sketch!  Don't forget to check out the Practical Scrappers blog post regularly for sketchy ideas for both layouts and cards.

See you soon!
Majken Pullin

Monday, March 3, 2014

Birthday Cards with My Mind's Eye

Hi everyone!

Are you as tired as I am of going from 30 degrees to 75 degrees and back to 40 degrees? Yes, I know I live in Houston and this is "normal".  That doesn't mean I have to *like* the cold front coming in -- AGAIN -- that will plummet us back into winter.

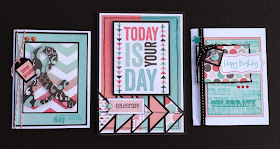
Well, to help combat the cold, winter doldrums, I wanted to share with you some fun birthday cards that I made using My Mind's Eye Cut and Paste "Flair" collection (if you know about my paper hoarding, then I should tell you that the deepest stack of paper I always have is from My Mind's Eye...I have loved them since they started, and still have a few pieces of their earliest collections stashed away.)

The card on the right was shared as part of the Practical Stampers birthday card post, but I wanted to share all three with you here today.


Happy Birthday & Many More - 4.25" x 5.5" card

The MME Cut & Paste collection sports ampersands, and I took that theme with the first card and cut an ampersand using my Cameo.  I used pop dots to bring the ampersand up from the chevron paper mat, which I framed with black cardstock.  That is again framed with the ombre blue paper, which is also matted with black cardstock.  I stamped the "Happy birthday" on the pink ombre paper and cut it to fit in the CTMH black tag that I tied onto the card with twine.  Next I stamped the dashed line and the "many more" on the bottom.  Embellished with two gems, and done!


Today Is Your Day - 5" x 7" card

This next card is simple and geometrical.  I first cut the "Today Is Your Day" card from the cardstock and framed with black cardstock.  I sewed through the triangles in black thread. This is matted onto a background of half pink/half blue ombre paper from the collection, which I sewed twice around as a frame, matted onto white cardstock, and then adhered to a black cardstock frame.  Finally, I cut several squares of various papers into 2" squares and cut diagonally to create triangles.  I cut black cardstock squares slightly bigger and again diagonally to create the triangle mats.  I layered them, sewed along them, and then put the "Celebrate" banner over with a brad.


Happy Birthday/Celebrate - 4.25" x 5.5" card

I cut some of the blue ombre paper and random-stamped the "Celebrate" CTMH stamp in second and third generation, finishing with a first generation bottom center and matting with the pink ombre paper (both inked along the edges).  I cut the polka dot paper rectangle, and framed it with distressed black cardstock.  I stamped the frame and "Happy Bithday" and fussy cut around the frame.  Finally, I cut a square of the flower paper, adhered it to the black CTMH tag, tied in the black CTMH ribbon, and put the button with twine in the middle.  I finished the card three Basic Grey candy buttons and one of my favorites: a Maya Road star pin.


Thanks so much for visiting today!  I hope you are staying warm wherever you are.

Hot chocolate and whipped cream for everyone!
Majken Pullin

Materials Used:
My Mind's Eye - Cut & Paste "Flair" collection (paper, brads)
CTMH black ribbon, black tag charm, twine, Hollyhock ink, Lagoon ink, black cardstock
CTMH stamps:  D1475 "Celebrate"; C1429 "Happy birthday" and frame; D1475 "Many More"; C1441 dashed line; C1394 "celebrate"; C1257 "Happy Birthday"
Basic Grey candy buttons
Doodlebug Design mini-pearls
Maya Road star pin