Pages

Thursday, March 26, 2015

Milestone: Kindergarten - Scrapping Our Stash Blog Hop - Giveaway Included

Happy Friday everyone, and thanks for joining us for another "Scrapping Our Stash" blog hop! You should've arrived from Sandy's blog - love that layout of her sweet grandbaby! If you've lost your way, the full list is at the bottom of this post, just after the GIVEAWAY information.  :)  Take a look at today's layout and then follow the directions for a chance to win!

Today I'm sharing a two-page layout, which I haven't done in awhile.  It was fun to do because I had several photos I wanted to include for Paxton's first day of Kindergarten. I dug into my stash and came up with Bella Blvd's Max collection.  It's so fun, and I also have used it for another layout with him.  For today's project, I used a PageMaps sketch from Scrapbooks & Cards Today Spring 2015 issue.


I blurred his teacher's face and name to protect her privacy.

Here is the sketch - I broke the 5x7 photo on the left into two photos, and the flowers became stars!


 I liked the colorful variety of the Text Me paper, so I used that across the bottom of two pieces of textured white cardstock.  I included a border that uses the striped paper as well as a strip of blue "All Boy", and then I sewed along underneath that border strip.


For my title, I used the orange stickers from the collection for "Milestone:" and cut "kindergarten" out using my Cameo.  I trimmed 3D foam tape to pop up "kindergarten".

For the photos, I inked the edges using black Stazon ink to help frame them.  Next I matted them using the grey camoflage paper and the blue robot paper, and then I sewed a border just inside the grey camoflage paper.  I matted my favorite photo of him using white cardstock to help it stand out.  And I used various stickers from the collection around the layout.


The top left corner includes striped paper, green scalloped border sticker, blue corner sticker, sewing, and stars trimmed using my Cameo.


The top right area includes blue scalloped border sticker, trimmed green border sticker, sewing, and more stars.


I hope you enjoyed my version of this sketch!  

Ready for my giveaway??  Yes??

I'm giving away one $15 e-gift certificate to My Scraps & More.  All you have to do is:
  • Be or become a member of my blog with Google+, Friend Connect, or Bloglovin AND
  • Leave a comment on this blog post
Refer a friend who joins my blog for an extra chance at the prize (please note that you have done this in a 2nd comment and have the referral tell who referred them in a comment on this post).

Simple!  You have until Monday, March 30th at noon Central time to enter for your chance to win.  International entries are fine, and I use random.com to choose the winner.  I'll announce the winner here on my blog on Tuesday, March 31st.  Good luck!  

Now it's time to hop to Juliana's blog to check out her adorable puppy layout!

Have a scrappy weekend!  Make it one with a bit of chocolate.  ;)
Majken

The full blog hop list if you wish to start at the beginning:


Friday, March 20, 2015

XOXO - My Scraps & More Sketch Reveal #102

I hope everyone is enjoying their Friday...it is International Day of Happiness, after all!  Welcome to another sketch reveal from the My Scraps & More sketch blog.  See my creation below, but please go check out all the other great designs from the team.  I created this layout using Crate Paper's Kiss Kiss - it's so fresh and pretty!  I felt it matches these cousins' rosy cheeks as I caught a photo of them hugging.  So cute!!


 I used the Kiss Kiss paper with the rosy heart on it for my base.  I cut various hearts out using my Cameo, then I distressed the edges of each of them.  In lieu of the cross-hairs in the sketch, I sewed Xs through the hearts to represent kisses.


I decided the title of XOXO would be perfect, so I found a font I liked and cut that out - I purposely left the title plain and sewed over it.  I wanted it to be soft and subtle.  I stretched the title a bit to the left from what the sketch has.


Next I created an embellishment area in the top left using a "love" wooden embellishment, and I sprinkled a few tiny wooden hearts around the layout.


I matted the photo with pink and layered it again on the words paper.  I stuck a tab of organdy ribbon and a heart pin, and popped up the photo with 3D tape for dimension.


And here is Ashley Horton's sketch:


That's all for me - thanks so much for stopping by my little piece of the blog world today! May your weekend be as sweet as chocolate.  <3

Majken

Monday, March 16, 2015

M Plus T

Hello and happy Monday everyone!  I hope you enjoyed Friday the 13th, followed by Pi day.  We celebrated with a couple of slices of pie from local bakery we like.  I could've made one, but then I would have kept eating it.  ;)

Well, like most of you out there in scrapbook- and papercrafting-land, I have a few favorite manufacturers.  You probably already know about my My Mind's Eye love.  But another favorite of mine is BasicGrey.  I love their collections...you even see one in my blog header.  :)  

Today I'm sharing a layout using BasicGrey's new Prism collection I got from My Scraps & More.


I fell in love with this photo Tim snapped our first day at Disney World, and rather than make the layout about our trip, I made it about us.  As I was looking for papers to scrap with this photo, I came across a brick wall pattern and got the idea to use a heart and initials just like you see scratched into a wall or a tree.  But as I kept working with the layout I had in my mind, I just couldn't make that paper fit.  And I recently got Prism, and I loved the small bits of blue in the collection that I felt would work with the blue in our shirts.  I decided to download a brick wall pattern from the Silhouette store and cut it on my Cameo to get the right look.  Once I had my background, I taped the template to my base, combined Teresa Collins modeling paste and paint to get the colors I wanted, and spread it on!

While that dried, I found the heart with arrow in the Silhouette Store as well.  I overlayed it on the brick wall pattern until I got the size I wanted, deleted the brick pattern, then cut the heart/arrow out using the black patterned paper from Prism.  With the rest of that paper, I made a frame for the white paper and sewed around the edges.  I then sewed in between the hearts and along the length of the arrow.


This was my first time using texture paste, and I LOVED it.  What great dimension, and you can give it any look you want with paint, inks, glitter, and more!  For my title, I couldn't find an alpha with any plus signs in them, but I came across the Amy Tan Kal Barteski thickers, which has a # sign.  I altered the # to become a +, and I love the look of the black Thickers on the textured bricks:


A few enamel dots, a couple of hearts, some stickers from the collection, and journaling inside the heart...and it came together pretty quickly.

Have you used texture or modeling paste?  Did you like it?  I hope my project inspires you to work with this fun medium!  

Thanks for stopping by today!  Enjoy your week.

Majken


Friday, March 6, 2015

The Good Life -> My Scraps & More Sketch Design Team Introduction!

Hi everyone!  

I'm SO EXCITED I was recently announced as part of the My Scraps & More sketch design team!  I'll be sharing layouts twice a month as part of my term, and I'd love you to play along.  My Scraps & More is a great online retail scrapbooking store with a ton of products from key manufacturers and owned by the very talented Audrey Yeager.

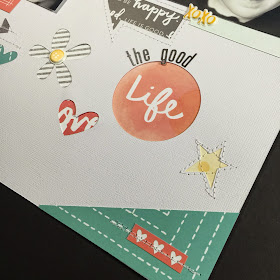
Today's layout was so fun to create - I was so inspired by Audrey's sketch!  I used two black & white photos that my best friend took of my kids in 2012 along with Amy Tan's Stitched collection.  


As soon as I saw the sketch, I knew I wanted to use negative space for the icons.  The first thing I did was open Silhouette Studio and lay out the different shapes until they were in the right spots.  I used a rectangle the same size as my photos just for reference, and then moved the rectangles off the cutting area before cutting.


After I cut my white cardstock, I placed various papers behind the layout until I got the look I wanted.  Then I sewed along specific images, starting with the large star.  I sewed along the outside edge, and also the inside to give it texture.


To match the sketch, I sewed along the arrows as well, and I put my short journaling there to mark the date the photos were taken.  


Next, I sewed around the other two stars, along the photo of my son, and around the arrow.  The photo mats are pocket scrapbooking spots trimmed from the Stitched Scissors paper.


To finish the layout, I trimmed 0.25" from the right and bottom and put the entire page onto the green stitched paper so it shows on the top and left sides, and then I framed the bottom right with a corner from the same.  Puffy stickers from the Stitched collection complete the flower centers and accents.  I added black alpha stickers to complete the title "The Good Life".


I hope this sketch and my interpretation has inspired you!  Go check out the full reveal for some other takes on the sketch, and don't forget to link up your version of the sketch to the My Scraps & More Sketch blog before midnight ET on March 31st for your chance at a great prize -> new stuff from the new BasicGrey Prism collection!


And here is the sketch.


Thanks for stopping by today...have a wonderful weekend!

Majken

Tuesday, March 3, 2015

Giveaway Winner - Scrapping Our Stash Blog Hop

Hello all!  Thanks to everyone who hopped along with us and left comments about my Adore layout…it was so fun to make and share.

Today's winner was chosen using random.org again, and today #4 is the winner!  (Note: 
a duplicate comment was skipped).


Sandy Ross is #4 scrolling down on the list...thanks so much for hopping along with us, Sandy!


Please email me at majkenmarie at yahoo dot com to claim your e-gift certificate!  You have until midnight Central time on Sunday, March 8, 2015 to claim your prize.

Thank you to each of you who participated in the hop, commented on all the great projects, and joined my blog!  Your sweet comments mean the world.

Majken