Pages

Thursday, January 28, 2016

Scrapping Our Stash Blog Hop - My Whole World using BasicGrey

It's the last weekend of January, and so you know what that means? We're having a blog hop to help use some our large stashes! And boy, do I stash.  And then I stash more. And then I do a little hoarding. And then new collections come out, and I buy more. <ahem>

Anywaaaay...you should've arrived from Juliana's blog with her gorgeous layout about her puppy. Such fun projects so far, so take a peek at my layout, scroll down to enter in a giveaway, and then keep hopping for more fun projects. Here we go!

So I got out my BasicGrey Typeset collection and used a dash of some BasicGrey Sunkissed embellishments to go along with it. (I'm soooo bummed they are leaving the industry.) :(


I wanted a way to use several patterns from the Typeset 6x6 paper pad without overwhelming the photo. So, I started by pairing 5 papers from the paper pad and cutting 0.75" wide strips into 1.5" lengths for a bunch of "bricks" to layer as the bottom border.


I layered them in three rows, stuck them down with a dab of adhesive, and then sewed along each row. I stuck a few sequins and gems along the stitching and then popped up the "Capture This Moment" sticker with 3D foam tape.

I put another row of the "bricks" at the top and sewed again, this time adding the embellishment cluster.


Then I focused on my photo area by layering a few sheets of the 6x6 pad leftover from the strips. I created a few tabs and a photo corner too.


Finally the title using the alpha stickers from Sunkissed and the word "whole" cut with my Cameo, with some added stitching.


I hope this inspires you to CUT UP some of your 6x6 paper pads and have fun with them! 

Are you ready for the giveaway? I'm giving away a $15 gift card to Paper Issues so you can add to your own stash! All you have to do is:

  • Follow me on instagram AND
  • Be or become a member of my blog with Google Friend Connect or Bloglovin AND
  • Leave a comment on this blog post
Easy peasy! You have until Monday, Feb. 1st at noon Central time to enter for your chance to win. International entries are fine, and I use random.com to choose the winner. I'll announce the winner here on my blog on Tuesday, Feb. 2nd. Good luck! Thanks so much for hopping along with us.

Now head over to Suzanna's blog to get more inspiration and see a unique snowflake cut file!  Thanks so much for stopping by!


Lee-Anne  http://lee-annelovethejourney.blogspot.com
Majken http://chocoscrapaholic.blogspot.com/  ***YOU ARE HERE***
Suzanna http://lifestrivialities.typepad.com   ***VISIT HERE NEXT***

Monday, January 25, 2016

Reach for a Smile - Paper Basketweave Technique for Scrap Our Stash January Book Challenge

Hi scrappy friends!  So glad you are here.  I'm popping back this month to share a new layout using a fun paper strip basketweave technique.  I actually woke up one morning with the idea in my head - but I'm not sure if I was dreaming about scrapbooking or something else!?  In any case, I came up with this layout for the Scrap Our Stash January Book Inspired Stash Challenge #34 and decided to use it.  

My inspiration from the book is the overall "sketch" from the book cover layout - you can see the curve of the snow from the book, the photo is placed where the Cat in the Hat stands, the title placement, and the journaling placement where the author is listed. Fun! Plus, this Fancy Pants Happy Place collection makes me smile. :)


I started by choosing two papers from the collection to include as my base. I used my trusty Cameo to cut both papers along the curve I created in the software.  I merged them together on a base white cardstock, put some paint spatters on the dark cardstock, and sewed along the seam.

I then focused on the basketweave mat for my photo.  I cut many 1/2" strips of multiple papers from the collection and started weaving. It's a bit unwieldy when you first start, but once you have three strips together, it stays nicely. When it got large enough to hold the photo while also leaving a nice border to show the basketweave, I glued the edges over to the back.


After that, the rest came together quickly! For the title, I was inspired by one of the phrases on the My Happy paper "Reach for a smile" - I used the Happy Place letters and found some old My Minds Eye phrase stickers to complete the first part of the title (I had to smile at my luck to find all three words I needed!). I outlined the words with a black pen to help them work with the Happy Place letters.


I put a few of my leftover strips to work as embellishment, and I created a chipboard heart using the My Happy paper and used a yellow Wink of Stella marker to highlight the word "joy".


I sprinkled some puffy stickers from the collection and cut some custom plus signs to pop up using 3D foam tape. And then did a spot of journaling between the plus signs.


I'm digging all the positive signs - goes with optimism and happiness. :)

Have you used the Happy Place collection? I hope you are inspired to grab some and make pretty papercrafts!

Have a great week!
Majken

Saturday, January 2, 2016

Our Merry Little Christmas - Using Leftover Positive Cuts

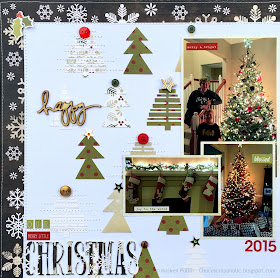
Hello and welcome to 2016!  My holiday break has just flown by...I'd love to have just one more week before returning to work!  I go back Monday...sigh!  Well, before turning the page on 2015, I was inspired by the positive cuts that I had from the border from this layout. Those cute, little trees should be used, I thought! So when I was flipping through my new Scrapbook & Cards Today 2016 planner and came across the December 2016 sketch, I hatched a plan to cut a few more trees using the Just Nick Studios Tree Trio cut file and other Simple Stories Cozy Christmas papers to put them into that grid pattern. Here's what I came up with.


I wanted to use the brown snowflake paper, but adding trees to it would've made the layout overly busy! So I matted a sheet of white textured cardstock with it instead, and offset it so that a wider edge would show on the left and top. Then I sewed along the edges just inside the snowflake paper and again just inside the white cardstock. I used a cream colored thread to help it stand out just a bit against the white.


I am a sucker for stitching, especially with cut files!  So I laid the trees out until the patterns were to my liking and sewed along the branches of the wider trees.  I knew I wanted the Heidi Swapp "happy" wooden embellishment on my layout so I kept it out until I knew where to adhere it.

The title was fun to create.  I purchased this Simple Stories phrase from the Silhouette store and cut just the "Christmas" out using a piece of the brown snowflake paper, plus two more times using plain cream cardstock so I could adhere them all together to get some depth to the word. I used alpha stickers and trimmed one of the Simple Stories stickers to get the "Our Merry Little" part of the title.

For the photos, I matted with another of the Cozy Christmas papers and put a few phrase stickers on them.  And below the tree photo, I used more alpha stickers to capture the year.


Then it was just a matter of filling in with some simple embellishments like gold sequin stars, gems, and buttons.  Plus adhering "happy" over one of the trees...that wooden phrase just makes me smile!  I felt the top left corner needed just a tiny bit of something, so I adhered the mistletoe sticker with 3D foam tape and adhered three red gems over each berry.  Super cute!


I opted to write my journaling on the back because I wanted to write quite a bit about our Christmas this year, and I didn't want to cram it on that bottom tree or in the bottom right corner.

So now I've used up most of my positive cuts from my previous layout, and it makes me happy to minimize my scrappy waste! What ways have you used your positive cuts?

Have a wonderful rest of your holiday, and I hope you've enjoyed a cup or two of hot chocolate.  :)

Winter hugs,
Majken