Wednesday, September 30, 2015

Giveaway Winner - Scrapping our Stash Blog Hop

Hi everyone!  I'm a day late, but definitely not a dollar short.  If you didn't get a chance to hop along with us, definitely worth checking out the projects.  The full list can be found on the bottom of the Confetti Cards post.  My favorite card from this post is the confetti shaker card.  I need to make more shaker cards!

Today's winner was chosen using random.org...and #1 wins! That's Ruth G.:


Ruth, please email me at majkenmarie at yahoo dot com to claim your e-gift certificate!  You have until midnight Central time on Monday night, Oct. 5, 2015 to claim your e-gift card.

Thanks so much for playing along!  You might just get another chance at the giveaway the last weekend of October, so check back.

Chocolaty hugs,
Majken

Monday, September 28, 2015

Hello Simple Life - Stuck?! Sketch

Hi everyone!  I know everyone is now looking to autumn-themed layouts, but I'm still enjoying summer.  :)  With that spirit, I wanted to use more of my Simple Stories Summer Vibes collection - I think it's my favorite Simple Stories collection so far.  The colors are amazing!  I also found this sketch at Stuck?! Sketches and really wanted to leverage it.  When I think of "The Simple Life", this vacation in Colorado Springs four summers ago is what popped into my head, so I ran with it!


I was saving the "Shine On" sheet for something and decided this sketch was it!  I first sewed along some of the sun rays in gold thread to define them and I went over a few of the rays twice to add interest.  I trimmed a strip of the "Hello" paper for the bottom to help anchor the page.


The Be Happy sticker was perfect for the center to cover where the sewed lines met.

Then I just started cutting and layering more Summer Vibes papers for the journal spot and photo spot.  I found a clear acetate tag with gold triangles (and some other elements you will see) from Pink Paislee's Citrus Bliss Ephemera pack and a "five o'clock somewhere" wood element in my stash and knew I wanted to incorporate them!  Once I had most of my papers trimmed, I cut a few circles of the "Just Beachy" wood-grain paper.


I created the title by trimming "Simple Life" from one of the papers.  I have a combo stamp/die set by KI Memories by Hampton Arts for Sizzix and stamped "hello" using StazOn brown ink onto a small piece of Shine On paper then cut with my Big Shot.

For the journaling spot, I used a couple of the rectangles from the Journaling Cards paper as well as a butterfly from my stash, some Summer Vibe stickers, a sequin and enamel dots.  I included the "memory" wooden element above it. 


Finally, I put a little embellishment spot in the upper right corner to complete the triangle for the wooden elements, even though this wasn't part of the sketch.  I used another acetate banner, some stickers, and sewing. 


Here is the sketch:


Thanks so much for stopping by today!  Make it a wonderful week.

Majken

Thursday, September 24, 2015

Confetti Cards - Scrapping our Stash Blog Hop with Giveaway

Hello crafty people out there!  Welcome back for this month's Scrapping Our Stash blog hop, where we pull out the crafty materials we've been hoarding and USE them to showcase the last weekend of the month.  You probably arrived from Alison's blog and those cute treat bags -- I'm so glad you hopped over!  Read on and then enter for your chance at my giveaway below.

This month, I worked on some cards instead of a layout because my card stash is getting low.  I chose the Crate Paper Confetti collection by Maggie Holmes released in January.


Great black and gold elements combined with the pretty colors!  The first thing I did was create a shaker card filled with...confetti of course!!


I started with black textured cardstock and a "happy birthday" 4x6 card from the "Party" paper.  I trimmed the "happy birthday" out from the pocket card and set it aside for another card.  I punched confetti and sprinkled some chunky gold glitter in between two pieces of acetate from some packaging and adhered them together.  I layered the windowed pocket card over the confetti and stitched around it twice with gold thread.  Finally I adhered the "Celebrate" Thicker over the shaker area and stuck a Maggie Holmes bow from my stash below the window.  Quick, easy, and best of all...fun!


Next up - the happy birthday card using the piece I cut from the pocket card above.


Black textured cardstock is the base again.  I trimmed the party hat "Surprise" paper just smaller than the base and stitched in gold around the edge.  I used a waterbrush pen to watercolor over the sentiment in a peachy-pink color to match the collection, adhered to a piece of black cardstock, and stitched around the edge.  Then I watercolored around the outside edge of the stitching in light green and adhered that to the card base using 3D foam tape.  I added the "yay" Thicker and a gold sequin to finish.


"Yay" for the next card!  


I trimmed another piece of the party hat paper and stitched around the edge onto black cardstock.  I watercolored light green onto the outside edge.  Next, I trimmed the black "yay!" pocket card from the "Party" paper and stitched around it.  I tied some twine around the top, adhered it to the card, and put the "Celebrate" Thicker on the bottom.


Last but not least, "happy day":  


I trimmed a piece of the words paper from "Backdrop", stitched to black cardstock, and then watercolored in light green around the edge and to highlight a couple of the phrases.  I cut a few of the banner pieces from the "Party" paper and stitched through the center one.  I finished the card with tiny alpha stickers from Tim Holtz and a few Confetti gold sequins.


Well, that's all for me today!  I'm happy to have a few more cards in my stash, and this was the perfect collection for them.  


****Giveaway Time!****

I'm giving away one $15 e-gift certificate to My Scraps & More.  All you have to do is:
  • Follow my blog with Google Friend Connect, Google+, or Bloglovin AND
  • Leave a comment on this blog post with your favorite type of card to make
Simple!  You have until Monday, Sept. 28th at noon Central time to enter for your chance to win.  International entries are fine.  I use random.com to choose the winner.  I'll announce the winner here on my blog on Tuesday, Sept. 29th.  Good luck, and now it's time to hop along to Katrina's blog to check out her pretty project!

xoxo,

Thursday, September 17, 2015

Spring Break Getaway | My Scraps & More Sketches - Sketch 114 Reveal

Howdy howdy, and welcome back to my blog for sketch reveal #114 for the My Scraps & More sketches blog.  We’d love to see your take on our September sketches – just link up to the blog before end of day Sept. 30th for your chance to win a Halloween assortment of crafty goodies!  Today’s sketch is a fun grid sketch and there were so many different ways I could've used it.  I chose to keep fairly close to the sketch using small squares from Jillibean Soup's Summer Red Raspberry collection (it's so pretty...check out another layout I created using this collection).  I did use 3 photos like the sketch, but I changed the placement up a little.
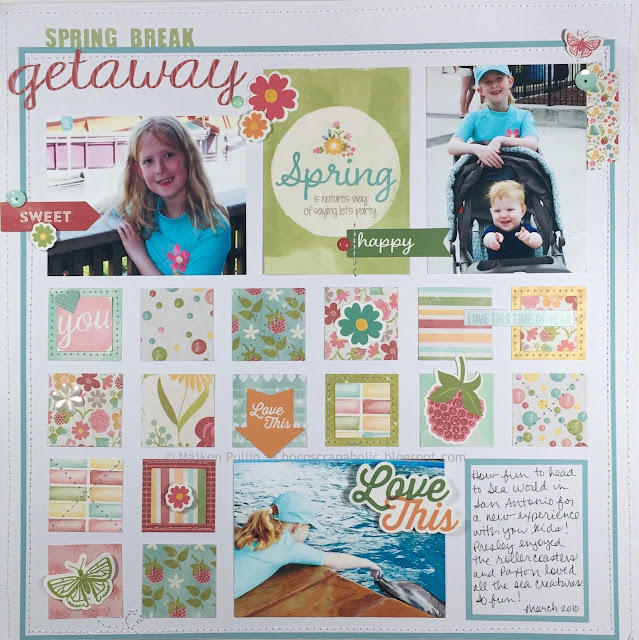

So I started with a base of white textured cardstock and started cutting various patterns from the collection.  I cut from both the 12x12 papers and the 6x6 paper pad.  Then I just started laying them out around the photos.  I liked the papers, but I felt there was still too much white space.  So I ended up trimming another piece of white cardstock and framing it with CTMH Crystal Blue cardstock and then placed out the pieces again.  I sewed the inside edge of the inside white cardstock, adhered it to the bottom center of the 12x12 white cardstock base and then sewed around the left, top, and right of the page for additional texture.  Once I had that together, I started adhering the squares and photos.  I added sewing and ephemera around the page as well, some with 3D foam tape.  I love that little butterfly!  After sewing it down the middle with a swirl, I pulled the wings up slightly.


How cute is the pocket piece that has the Robin Williams quote "Spring is nature's way of saying 'let's party'"?  


I decided I had to add another of those butterflies in the top right along with a tab and sequin.  Aren't my little strawberry blonds cute?


Next up:  the title.  I went digging for matching stickers and found some light green Fancy Pants Designs from the Memories Captured sticker sheet.  Then I cut out "getaway" using my Cameo and a matching striped paper from BasicGrey's J'Adore collection.


I left a journaling spot as well and decided to frame that as well.


Here's the sketch!  Don't forget to go check out all the other lovely layouts from the sketch team.  Have a super weekend, and thanks for visiting!


Thursday, September 3, 2015

Kitty's Happy Place | My Scraps & More Sketch 113 DT Reveal

Welcome back, chocoscrapaholics!  And happy Friday-before-a-three-day-weekend.  Not only do we celebrate (I guess we don't really celebrate it, but still!) Labor Day this weekend, but it's also sketch reveal for My Scraps & More sketches.  And I opted for a slightly different twist to the sketch after I saw it!

The first thing I noticed on the sketch was of course the "plus sign" background...and a recently purchased cut file popped into my head and I decided I had to use it:  the Positive-1 cut file from the JustNicks shop.  I've loved Nicole's cut files for awhile and have quite a collection grown from the free ones she's done for SCT Magazine and others.  If you haven't checked out her new online store....DO IT.

So here is my sweet kitty Snickers, covered in a hidey hole she found in the sheet on the master bedroom floor (I guess this tells you a little about how often I actually make our bed <winky smile>).  She is ALWAYS happy and purring when she has a little "cave" she can crawl into.  It's her happy place!  And isn't this Crate Paper Wonder collection beautiful??  I love, love, LOVE it!  Grab yours from the My Scraps & More store and use code 20SEPT15 for 20% off.  Don't forget to link up your own projects using the sketch for a chance to win some scrappy goodies!


So, the first thing I did was trace and then cut the file using my Cameo and some white textured cardstock.  Then I cut squares of various Wonder papers slightly larger than the cuts and adhered to the back in a random-yet-chosen arrangement.  And then I sewed along each side of the middle plus signs to help define the plus sign in the sketch.  And then I decided to further define some of the plus signs with additional sewing through the middles and outlining.  Here's what it looked like after that:


I love the kitty paper in the collection for this layout!

Next up is the photo area. I used vellum and a few papers from Wonder to frame them and then used 3D foam to pop up the whole photo area slightly.  I just HAD to fussycut a "hello" speech bubble!


Next was the title.  I love these gold Thickers!  And "Happy Place" comes from an older sticker sheet from my stash (Webster's Pages "Recorded).


And then some journaling of course!  I decide to use the "square" between the plus signs for my journaling.


Finally, another "hello there" sticker from my stash (above) and a few sequins and enamel dots from Wonder (above and below).


If you haven't already, definitely go check out the other designers takes on the sketch for more inspiration!  The sketch Audrey created:


Have a wonderful, scrappy weekend everyone!

Majken