Hello lovelies-
I hope you are doing well and are in the crafty spirit. We're nearly about to put our focus on All Things Christmas, but first I wanted to make sure to share this layout that is up on the JustNick Studio blog.
Hop on over to see details and cut files used for this project. Isn't that little rainbow dimensional sticker adorable, too??
Have a great weekend!
Majken
Showing posts with label Presley. Show all posts
Friday, November 29, 2019
Friday, June 7, 2019
Happy Beautiful Smile | JustNick Studios Design Team & Process Video
It was a labor of love, y'all. I figured out (clumsily) how to create and edit my process video using only my iPhone and iMovie. It wasn't fast or easy, but I did it! And I'm proud to share it here - I'd LOVE for you to subscribe to my channel, too. :) Let me know what you think in the comments!
I shared this layout on the JustNick Studios blog on Wednesday and had hoped to have the video done, but....life! But do check the blog post for tips and close ups.
Here is the full layout using two JustNick cut files and Cocoa Vanilla Studio Happiness. The colors are so happy and the Blossom cut files are gorgeous!
Process video:
Thanks so much for visiting today. Make it a crafty day!
Majken
I shared this layout on the JustNick Studios blog on Wednesday and had hoped to have the video done, but....life! But do check the blog post for tips and close ups.
Here is the full layout using two JustNick cut files and Cocoa Vanilla Studio Happiness. The colors are so happy and the Blossom cut files are gorgeous!
Process video:
Thanks so much for visiting today. Make it a crafty day!
Majken
Monday, April 8, 2019
Sweet | JustNick Design Team
Howdy crafty friends! Welcome to April, welcome to spring. I'm here today with a fun mixed media cut file layout for JustNick using a very spring-y floral cut file and elements from Pink Paislee's Take Me Away collection by Paige Evans. Take a look!
If you are new to mixed media or looking for some tips, I share a good tip on the JustNick blog on keeping your paper flat to cut mixed media using your electronic cutting machines (such as my Silhouette Cameo). Go check out the tip and some close ups where you can see I used Bo Bunny Sugar Glitter Paste as a glue for some beads and sequins. Fun!
Thanks for visiting today!
Majken
If you are new to mixed media or looking for some tips, I share a good tip on the JustNick blog on keeping your paper flat to cut mixed media using your electronic cutting machines (such as my Silhouette Cameo). Go check out the tip and some close ups where you can see I used Bo Bunny Sugar Glitter Paste as a glue for some beads and sequins. Fun!
Thanks for visiting today!
Majken
Monday, October 15, 2018
Fall Family Fun | JustNick Studios Design Team Layout with Simple Stories
Howdy crafty friends! Happy Monday to you. I'm sharing a fall themed layout today on the JustNick Studio blog - go take a peek to see some close-ups. Here is the full layout. I used the gorgeous Forever Fall collection from Simple Stories. Such beautiful colors!
Head over to the JustNick Studios blog for some close ups and see the cut file I used.
Have a super week, and happy fall!
Majken
Head over to the JustNick Studios blog for some close ups and see the cut file I used.
Have a super week, and happy fall!
Majken
Monday, September 10, 2018
{All of Me Loves All of You} Using JustNick Cut Files for Stitching - Tutorial
Hi crafty peeps! If you have a large project you want to hand stitch, but want to skip the tedious process of poking the holes, then I have just the tutorial for you. Take a look:
I used the gorgeous Cocoa Vanilla Studio Wild at Heart collection along with the All of Me Loves All of You JustNick Studio cut file.
To see how to create a hand-stitched project from a cut file (along with a couple of close-ups), head over to my post on the JustNick Studio blog today!
It's hard to believe those babies are now 16 and almost 10! Thank you so much for stopping by. Have a super week!
Majken
I used the gorgeous Cocoa Vanilla Studio Wild at Heart collection along with the All of Me Loves All of You JustNick Studio cut file.
To see how to create a hand-stitched project from a cut file (along with a couple of close-ups), head over to my post on the JustNick Studio blog today!
It's hard to believe those babies are now 16 and almost 10! Thank you so much for stopping by. Have a super week!
Majken
Wednesday, January 11, 2017
Oh Joy | Creative Scrappers January Sketch
Hello out there happy scrappers! Welcome to 2017. I was up Monday on the Creative Scrappers blog. Isn't the sketch awesome?! I opted to flip it 180 degrees. Also, the Pinkfresh Studio Oh Joy collection is just gorgeous. I mostly used the 6x6 paper pad and some embellishments from Oh Joy as well as Fancy Pants Merry & Bright puffy dots stickers...they matched well! Here's my layout.
I used the cut file created for the sketch on a sheet of white textured cardstock, cut papers to fit into the triangles, then sandwiched them on top of a full sheet of white textured cardstock. I sewed along the cut file for some additional texure. Cut files and sewing are a favorite combo of mine!
These photos of the kids from 2010 are perfect with these gorgeous papers! I loved tucking in the ephemera and puffy stickers. I created my own sewn tag using the acrylic "on the nice list" piece to put in the bottom right.
For the title, I purchased the font "Hello Sunshine" and cut out "Oh Joy" because I was so inspired by the collection's logo. I used an enamel star as the dot for the "j".
I hope this page has inspired you to get some Christmas photos scrapped! If you use the sketch, please use the hashtag #creatingwithsketches and post to the Creative Scrappers blog using the InLinkz widget. And don't forget to follow @creativescrappers on Instagram!
Have a wonderful January!
Majken
I used the cut file created for the sketch on a sheet of white textured cardstock, cut papers to fit into the triangles, then sandwiched them on top of a full sheet of white textured cardstock. I sewed along the cut file for some additional texure. Cut files and sewing are a favorite combo of mine!
These photos of the kids from 2010 are perfect with these gorgeous papers! I loved tucking in the ephemera and puffy stickers. I created my own sewn tag using the acrylic "on the nice list" piece to put in the bottom right.
For the title, I purchased the font "Hello Sunshine" and cut out "Oh Joy" because I was so inspired by the collection's logo. I used an enamel star as the dot for the "j".
I hope this page has inspired you to get some Christmas photos scrapped! If you use the sketch, please use the hashtag #creatingwithsketches and post to the Creative Scrappers blog using the InLinkz widget. And don't forget to follow @creativescrappers on Instagram!
Have a wonderful January!
Majken
Thursday, October 8, 2015
Pick a Pumpkin
Happy day out there in scrappy land! Please, grab some chocolate and stay for a few minutes. Today I've dipped my toes into fall - the weather has already started to cool just a bit here in Texas. Yay!
Today I have a 2-page layout for you. I haven't done one of these in awhile and I felt I had some good photos to spread out for this one. I used the third one down from Scrapbook & Cards Magazine fall sketches for this one, stretching it into two pages, and I kept it simple.
I started with kraft cardstock and a Jillibean Soup placemat cut file which I cut using my Cameo and CTMH Cashmere cardstock. I added a border to the left and right side of each page with some sewn strips.
Today I have a 2-page layout for you. I haven't done one of these in awhile and I felt I had some good photos to spread out for this one. I used the third one down from Scrapbook & Cards Magazine fall sketches for this one, stretching it into two pages, and I kept it simple.
I started with kraft cardstock and a Jillibean Soup placemat cut file which I cut using my Cameo and CTMH Cashmere cardstock. I added a border to the left and right side of each page with some sewn strips.
I sewed around some of the circles on the placemat and also layered a green striped Bella Blvd paper behind one (with a punched star over it in a yellow stripe paper).
Over the right side of the placemat, I put black corrugate paper from Fancy Pants Designs. It adds great texture! I also cut a green stripe tab to tuck behind the photo of my sweet son, and added a few black enamel stars from Bella Blvd. I also created an embellishment circle with sewing and a chipboard element from Bella Blvd. I love my little pumpkins! :)
For my title, I cut "PICK A" from black textured cardstock, and I cut "pumpkin" in a different font using the orange stripe paper.
I added another green stripe tab with a black enamel heart. Another stitched circle and chipboard combo with another enamel element:
Then I added a strip of printed journaling to the side of the photo area, with a punched star on each side.
I need to go back and add the date, but this was fall 2014.
Well, that's all for me today! I supposed we are getting close to adding hot chocolate to our evenings. For me, that's the best part of cold weather. :)
Have a fabulous week!
Majken
Thursday, September 17, 2015
Spring Break Getaway | My Scraps & More Sketches - Sketch 114 Reveal
Howdy
howdy, and welcome back to my blog for sketch reveal #114 for the My Scraps
& More sketches blog. We’d love to
see your take on our September sketches – just link up to the blog before end of day Sept.
30th for your chance to win a Halloween assortment of crafty goodies! Today’s sketch is a fun grid sketch and there
were so many different ways I could've used it. I chose to keep fairly close to the sketch
using small squares from Jillibean Soup's Summer Red Raspberry collection (it's so pretty...check out another layout I created using this collection). I did use 3 photos like the sketch, but I changed the placement up a little.
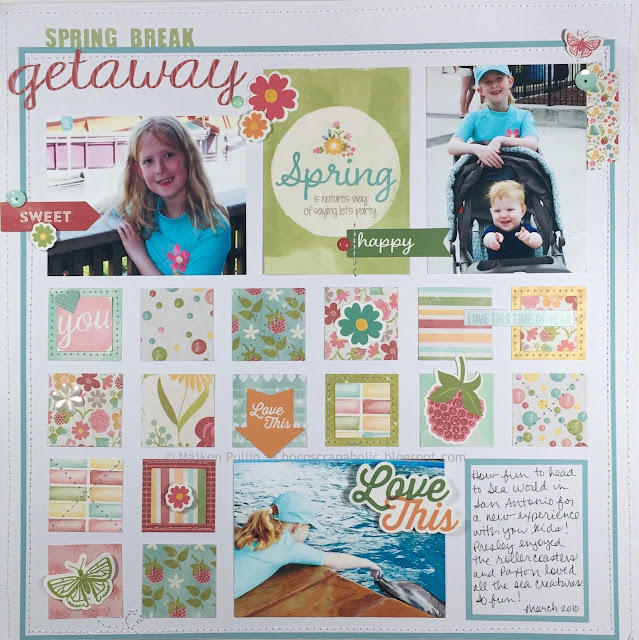
So I started with a base of white textured cardstock and started cutting various patterns from the collection. I cut from both the 12x12 papers and the 6x6 paper pad. Then I just started laying them out around the photos. I liked the papers, but I felt there was still too much white space. So I ended up trimming another piece of white cardstock and framing it with CTMH Crystal Blue cardstock and then placed out the pieces again. I sewed the inside edge of the inside white cardstock, adhered it to the bottom center of the 12x12 white cardstock base and then sewed around the left, top, and right of the page for additional texture. Once I had that together, I started adhering the squares and photos. I added sewing and ephemera around the page as well, some with 3D foam tape. I love that little butterfly! After sewing it down the middle with a swirl, I pulled the wings up slightly.
How cute is the pocket piece that has the Robin Williams quote "Spring is nature's way of saying 'let's party'"?
I decided I had to add another of those butterflies in the top right along with a tab and sequin. Aren't my little strawberry blonds cute?
Next up: the title. I went digging for matching stickers and found some light green Fancy Pants Designs from the Memories Captured sticker sheet. Then I cut out "getaway" using my Cameo and a matching striped paper from BasicGrey's J'Adore collection.
I left a journaling spot as well and decided to frame that as well.
Here's the sketch! Don't forget to go check out all the other lovely layouts from the sketch team. Have a super weekend, and thanks for visiting!
Thursday, July 16, 2015
She is my Sunshine -- My Scraps & More sketch 110 reveal
Hello out there! Glad to be back on the blog today with the 2nd sketch reveal for July for My Scraps & More sketches. Today's sketch was a fun one by Juliana Michaels. When I saw the circles in the sketch, citrus immediately popped into my head! I had just downloaded a free sketch file from Scrapbook & Cards Today with a citrus slice...perfect! I combined Pink Paislee Citrus Bliss and Amy Tan Rise & Shine (that I got from MSAM) for my layout. Take a look:
The first thing I did was cut two 4" citrus slices using white cardstock. I cut two citrus "rinds" using the orange side of "Rachel" paper. I then backed the inside of the slices with various papers from both collections.
I flicked some of Heidi Swapp's Patina Color Shine to my base, and then I sewed a long rectangle from the "Sour" paper to my white cardstock base. Next I placed my citrus slices and sewed zig zag stitches to connect the inner and outer layers of the slices.
I placed buttons in the center of my slices for contrast. I love the zig zag stitching! Tip: sew slowly when going in circles - it's easy to get off track.
I matted my two photos with white cardstock (which I inked the edges of using CTMH Creme Brulee ink for more contrast) and the heart paper from Rise & Shine.
I took the bar code strip from Citrus Bliss Sour and sewed it along the bottom to anchor my page. I did a long strip of straight stitches and another strip of straight stitches with a small bit of zig zag on the right hand side. I placed some of the Citrus Bliss Ephemera on top of the bottom strip.
For my title, I used some letters from Simple Stories and Authentique as well as the "Sunshine" from the Citrus Bliss Ephemera pack, which I popped up with some foam tape.
I used a small journal tag from the Ephemera pack, some sequins, and more Ephemera around the layout.
Below is Juliana's fun sketch...please create your own version and link up to the My Scraps & More Sketch blog for a chance to win the July prize! Head over there now to take a look at the other designers' takes on her sketch, including her great layout of her pretty puppy!
Make it a fun weekend! See you soon.
Majken
The first thing I did was cut two 4" citrus slices using white cardstock. I cut two citrus "rinds" using the orange side of "Rachel" paper. I then backed the inside of the slices with various papers from both collections.
I flicked some of Heidi Swapp's Patina Color Shine to my base, and then I sewed a long rectangle from the "Sour" paper to my white cardstock base. Next I placed my citrus slices and sewed zig zag stitches to connect the inner and outer layers of the slices.
I matted my two photos with white cardstock (which I inked the edges of using CTMH Creme Brulee ink for more contrast) and the heart paper from Rise & Shine.
I took the bar code strip from Citrus Bliss Sour and sewed it along the bottom to anchor my page. I did a long strip of straight stitches and another strip of straight stitches with a small bit of zig zag on the right hand side. I placed some of the Citrus Bliss Ephemera on top of the bottom strip.
For my title, I used some letters from Simple Stories and Authentique as well as the "Sunshine" from the Citrus Bliss Ephemera pack, which I popped up with some foam tape.
I used a small journal tag from the Ephemera pack, some sequins, and more Ephemera around the layout.
Below is Juliana's fun sketch...please create your own version and link up to the My Scraps & More Sketch blog for a chance to win the July prize! Head over there now to take a look at the other designers' takes on her sketch, including her great layout of her pretty puppy!
Make it a fun weekend! See you soon.
Majken
Friday, July 3, 2015
{Hello Sunshine} My Scraps & More Sketch 109 Reveal
Hi everyone! I'm back on this fine Friday for another My Scraps & More sketch team reveal. Today's sketch was created by Audrey Yeager, and it was a really fun one! Sunbursts are very popular right now, and this sketch is a great take on it. When I first saw it, I envisioned cutting the sunburst out using my Cameo and filling it in with multiple papers - which is also a very fun trend. So that's exactly what I did.
I used several collections from the My Scraps & More store...they work perfectly together.
After I cut the sunburst out of my white cardstock base and lined the papers behind each "ray", I sewed along the outside edges of the sunburst.
After including the photos, I created the title using some Fancy Pants letter stickers from an older collection, and I cut "sunshine" out using my Cameo. I wanted an ombre effect for the title, so I used the Simple Stories Shine On paper...it's sooo pretty! To help "sunshine" pop, I cut it out again using white cardstock and glued it underneath to create a thicker word.
I wanted to keep my layout simple, but decided it needed an embellishment area, so I used the cloud sticker from the Simple Stories collection and pulled some baker's twine through a button.
I sprinkled a few sequins from Pretty Pink Posh, dots from October Afternoon and Droplets from Queen & Co. Finally, I included my journaling on the bottom right sunburst ray.
I hope this layout provide a little bit of sunshine to your weekend, and I hope you play along with the sketch! Link up at My Scraps & More sketches in July for your chance to win a great prize. Check out all the other designers' takes on the sketch for even more inspiration!
Have fun, and enjoy your holiday weekend!
Majken
I used several collections from the My Scraps & More store...they work perfectly together.
After I cut the sunburst out of my white cardstock base and lined the papers behind each "ray", I sewed along the outside edges of the sunburst.
After including the photos, I created the title using some Fancy Pants letter stickers from an older collection, and I cut "sunshine" out using my Cameo. I wanted an ombre effect for the title, so I used the Simple Stories Shine On paper...it's sooo pretty! To help "sunshine" pop, I cut it out again using white cardstock and glued it underneath to create a thicker word.
I wanted to keep my layout simple, but decided it needed an embellishment area, so I used the cloud sticker from the Simple Stories collection and pulled some baker's twine through a button.
I sprinkled a few sequins from Pretty Pink Posh, dots from October Afternoon and Droplets from Queen & Co. Finally, I included my journaling on the bottom right sunburst ray.
I hope this layout provide a little bit of sunshine to your weekend, and I hope you play along with the sketch! Link up at My Scraps & More sketches in July for your chance to win a great prize. Check out all the other designers' takes on the sketch for even more inspiration!
Have fun, and enjoy your holiday weekend!
Majken
Friday, June 5, 2015
Just Chillin' | My Scraps & More Sketch 107
I loved this sketch because it's so versatile. I started my center grid with a layer of wide silver and white My Mind's Eye washi tape, and then I trimmed pieces of the 6x6 paper pad as well as a border page from the collection to layer over the tape. After I had the pieces where I wanted them, I sewed in black along the grid.
I matted my photos in white and then black cardstock, and I used 3D foam to pop them up a bit for depth. I trimmed the #ForeverYoung piece from the barcode of one of my papers...I don't think I've ever used the collection name/logo in an actual layout before! But I thought it was fitting since the sketch "hashtag" is the center piece. :)
I trimmed two 12" strips to border the left and top of my layout and sewed along them to help frame my page. Next, I fussycut some of the citrus pieces and punched a heart to sprinkle around my page. I punched the "Sweet!" circle out of a journal spot piece to use as another embellishment. I stamped some ink spots and added the black foam arrows from an Amy Tan Plus One Kal Barteski Thickers set.
Next I created my title from Tim Holtz black letters and another set of pink foam Thickers. I stamped an arrow from the Bo Bunny collection and sprinkled some matching Queen & Co Droplets around the layout, too.
Here is a look at the sketch:
Now make it a point to play along for your chance at some goodies from My Scraps & More! They have a great collection of papers and embellishments as well as lots of great challenges on their Forum. Come join us!!
Have a super weekend everyone...chocolate dreams for every one of you!
Majken
Friday, April 3, 2015
Lucky 13 - My Scraps & More Sketch #103 Reveal
Hi sketchy, scrappy folks out there in papercrafting land! Happy Friday!
I'm having a blast participating with the My Scraps & More sketch team, and today's reveal has a great sketch created by Audrey Yeager. See my layout below, and then head over to the MSAM sketch blog to see how everyone else interpreted the sketch. I used Pinkfresh Studio's Up In The Clouds collection.
My daughter recently turned thirteen (eek!), and we celebrated with a dinner out at the restaurant of her choice.
My layout base was a Bazzill textured cardstock I had in my stash and matched the Pinkfresh very nicely. And I wanted the photo to rest on the neutral paper with the doodled hearts and stars, so I actually worked with that next.
After I had that part together, I inked the paper edges with a blue-green ink and layered the pink "Love" paper and the blue stitched papers behind it angled similarly to the sketch. Once I had the layers the way I wanted them, I cut the title numbers from the center of the blue stitched paper since I knew that would be hidden by the layers on top. This is a great way to save paper!
I finished the title with ink and stitching and then used Heidi Swapp alphas to spell "Lucky" over it.
For the top strip, I angled the doodle paper, inked the edge and stitched across it. Then I included some of the Pinkfresh hearts, some gems, and a wooden star. You can also see I outlined and filled in several of the hearts with a Gelly Roll glitter pen. I stitched around several parts of my layered papers.
Next, I created an embellishment cluster using a Heidi Swapp "shine", another Pinkfresh heart, and a wooden arrow.
I completed the layout with journaling. You can see more hearts and stars filled in with a Gelly Roll glitter pen.
I hope you join us with this sketch! Post your interpretation of the sketch during April for a chance at a great prize from My Scraps & More.
Have a fabulous weekend!
Majken
I'm having a blast participating with the My Scraps & More sketch team, and today's reveal has a great sketch created by Audrey Yeager. See my layout below, and then head over to the MSAM sketch blog to see how everyone else interpreted the sketch. I used Pinkfresh Studio's Up In The Clouds collection.
My daughter recently turned thirteen (eek!), and we celebrated with a dinner out at the restaurant of her choice.
After I had that part together, I inked the paper edges with a blue-green ink and layered the pink "Love" paper and the blue stitched papers behind it angled similarly to the sketch. Once I had the layers the way I wanted them, I cut the title numbers from the center of the blue stitched paper since I knew that would be hidden by the layers on top. This is a great way to save paper!
I finished the title with ink and stitching and then used Heidi Swapp alphas to spell "Lucky" over it.
For the top strip, I angled the doodle paper, inked the edge and stitched across it. Then I included some of the Pinkfresh hearts, some gems, and a wooden star. You can also see I outlined and filled in several of the hearts with a Gelly Roll glitter pen. I stitched around several parts of my layered papers.
Next, I created an embellishment cluster using a Heidi Swapp "shine", another Pinkfresh heart, and a wooden arrow.
I completed the layout with journaling. You can see more hearts and stars filled in with a Gelly Roll glitter pen.
I hope you join us with this sketch! Post your interpretation of the sketch during April for a chance at a great prize from My Scraps & More.
Have a fabulous weekend!
Majken
Friday, March 20, 2015
XOXO - My Scraps & More Sketch Reveal #102
I hope everyone is enjoying their Friday...it is International Day of Happiness, after all! Welcome to another sketch reveal from the My Scraps & More sketch blog. See my creation below, but please go check out all the other great designs from the team. I created this layout using Crate Paper's Kiss Kiss - it's so fresh and pretty! I felt it matches these cousins' rosy cheeks as I caught a photo of them hugging. So cute!!
I used the Kiss Kiss paper with the rosy heart on it for my base. I cut various hearts out using my Cameo, then I distressed the edges of each of them. In lieu of the cross-hairs in the sketch, I sewed Xs through the hearts to represent kisses.
I decided the title of XOXO would be perfect, so I found a font I liked and cut that out - I purposely left the title plain and sewed over it. I wanted it to be soft and subtle. I stretched the title a bit to the left from what the sketch has.
Next I created an embellishment area in the top left using a "love" wooden embellishment, and I sprinkled a few tiny wooden hearts around the layout.
I matted the photo with pink and layered it again on the words paper. I stuck a tab of organdy ribbon and a heart pin, and popped up the photo with 3D tape for dimension.
Next I created an embellishment area in the top left using a "love" wooden embellishment, and I sprinkled a few tiny wooden hearts around the layout.
I matted the photo with pink and layered it again on the words paper. I stuck a tab of organdy ribbon and a heart pin, and popped up the photo with 3D tape for dimension.
And here is Ashley Horton's sketch:
That's all for me - thanks so much for stopping by my little piece of the blog world today! May your weekend be as sweet as chocolate. <3
Majken
Subscribe to:
Posts (Atom)


