Showing posts with label fussy cutting. Show all posts

Thursday, January 23, 2020

Wonderful | JustNick Studio Design Team

Happy Thursday crafty readers!  I'm sharing a scrapbook layout today on the JustNick Studio blog - head over for some close ups and details on how it came together!

I used a background cut file and an alpha cut file, along with the bold and colorful Amy Tan's Slice of Life collection by American Crafts to highlight this cute photo of a Sweet Shop we visited in Banff back during our family vacation in 2016 (best vacation EVER!). And of course I had to buy some chocolate yummies.  :)


Have a great week!
Majken 
 

Sunday, December 31, 2017

"Lovely" - Published in the Summer 2017 Issue of Scrapbook & Cards Today Magazine!

Hello scrappy friends!  Well, it's certainly been an interesting 4+ months living through a horrific flood from Hurricane Harvey.  I've missed you guys, and I hope I can hop back on the papercrafting saddle more consistently now.  Our home is still not finished, but we are making progress.  All in due time, and we appreciate everyone's prayers and thoughts.  <3

I wanted to share my very favorite layout that was published this past June in the Summer Issue of Scrapbook & Cards Today Magazine.  I was truly beyond excited about it!  

I wanted to create a layout with my grandmother as the star.  She was the most beautiful ballerina, and she ended up owning and running her own dance studio that I practically grew up in.  I paired a black and white photo of her with the *stunning* Cocoa Vanilla Studio collection Wild at Heart.


The cut file is from Cocoa Vanilla Studio Colour Me Happy collection, and I also fussycut a lot of flowers to add in.  In addition to paper, enamel dots, and flowers from CVS, I used Thickers from American Crafts, a bow and gold heart from Crate Paper, and vellum and a fringed paper strip reminiscent of a ballerina's tutu.  Here are a few close ups.  


I hope you all have a wonderful New Year's Eve...here's to a grand 2018!

Chocolate hugs,
Majken

Sunday, July 16, 2017

Nothing Brings People Together Like Good Food - Pebbles Fussycutting

I have been inadvertently sitting on a collection from Pebbles that I bought awhile back, and I decided to play with it for Creative Scrappers sketch 308, which I shared on the Creative Scrappers blog Friday.  Take a peek at what I created with this month's sketch:


The warm colors and beautiful florals from Simple Life collection from Pebbles just pop, don't they?

I documented a date night I had with my husband at a new restaurant near us.  It was really delicious, and we had such a nice time.  We took several photos, which were perfect to document with this month's sketch - I simply "stretched" out the width of the smaller photo area to accommodate my photos!

Go check out close-ups on the Creative Scrappers blog, and don't forget to create your own layout using the sketch to link up!

Please share any layouts you create with a Creative Scrappers sketch on Instagram and tag us (@CreativeScrappers) with the hashtag #CSSketch308 and #CreatingWithSketches.

And don't forget to follow me on Instagram {@chocoscrapaholic}.  See you there!


Have a super week!
Majken

Saturday, May 13, 2017

{XO Forever Yours} Creative Scrappers 306 Reveal

Hello friends-

So glad you stopped by!  Yesterday I was up on the Creative Scrappers blog with my rendition of Kristine's super-fun sketch for May.  You can use up to 6 photos on this layout, and there are so many possibilities!  I scrapped some photos of my husband and I from our engagement photo shoot.  We'll celebrate 17 years this month!


Go check out close-ups on the Creative Scrappers blog and see how I colored some Gesso to paint on my layout (psst...it doesn't have to stay white!).

Have a great day.

Majken

Tuesday, April 26, 2016

Sweet Little Man

Hello out there in scrappy land!  Today I'm digging in to a new stash of Jillibean Soup Healthy Hello.  It's got great colors for girls, but I'm using it for a boy layout following along with Scrap Our Stash's April sketch + 3.  I used Jillibean Soup, Kraft paper, and lined paper for my three choices.  Isn't my little man handsome?  He crinkles his nose up at pink but loved the layout when I showed him!  I think the blue really balances it out.


I loved the sketch as soon as I saw it.  I took Just Nick's Scribble Circle Background and trimmed the top left circle from the full background, then enlarged it to cut out.  Then I machine stitched some wonky circles over the circle in dark blue thread.  It's fun to let the sewing machine go fast and crazy!

Speaking of crazy, I decided the small flowers needed to be fussycut so I could include on my layout.  I trimmed the flower journal card to pair with my photo.  I matted it and then trimmed a smaller piece of the lined paper journal card to stash behind.  I loved layering the flowers and stickers like the "awesome you" tab sticker.  Isn't the arrow paper fun?!


Here's the embellishment area on the bottom right of the layout.  I adore that "Herbed Hola" paper with the confetti circles!  I also used an arrow sticker and some word stickers, then added more fussycut flowers and some enamel dots.


Here's a close-up of the journal area:


For the title, I used some brown Thickers to go with the kraft paper as well as the blue alpha stickers from the collection.

One more close up of the fussycut flowers (don't they look pretty with the bluebonnet?) and enamel dots.


Here's a look at the sketch:


Fun sketch and super fun collection!  I hope you take a stab at the sketch and that I've inspired you to use your pink on a boy layout.  

Have a super week!
Majken


Tuesday, April 14, 2015

Silhouette PixScan Tutorial - Fussycutting Images

Hi everyone!  

Today I wanted to share a tutorial on how to fussycut images using the Silhouette PixScan mat.  It's fairly easy, and if you have a lot to cut, it can be a huge timesaver!

Note:  If you haven't calibrated your PixScan mat for your camera, here's how.

My tutorial will show how I cut the doilies for my Disney World visit with my favorite Hundred Acre Woods friends.  So let's get started!

The first thing you want to do will be to place the paper you want to cut onto the PixScan mat.  This can be a patterned paper or a paper with stamped images you want to cut.  Next, take a photo of it on the mat using the camera you have calibrated.  Make sure the entire mat is in the photo - it's okay if there's other stuff in the frame as well (like my black posterboard I had underneath the mat in the photo below).  Save the photo in a directory on the same computer where you have Silhouette Studio software.


Next, open Silhouette Studio and choose the "Open PixScan Image".


On the right-hand side, the PixScan menu appears.  Choose Import from File, browse to where you saved your PixScan image, and choose it.


This imports your image and you will see something like this:


Your next step is to open the trace window.  


Then select the image you want to trace for cutting.


Next, select High Pass Filter range and the Threshold range to get as smooth and solid a piece as possible for your cutting edge.  For this doilie, here's the ranges I had.  


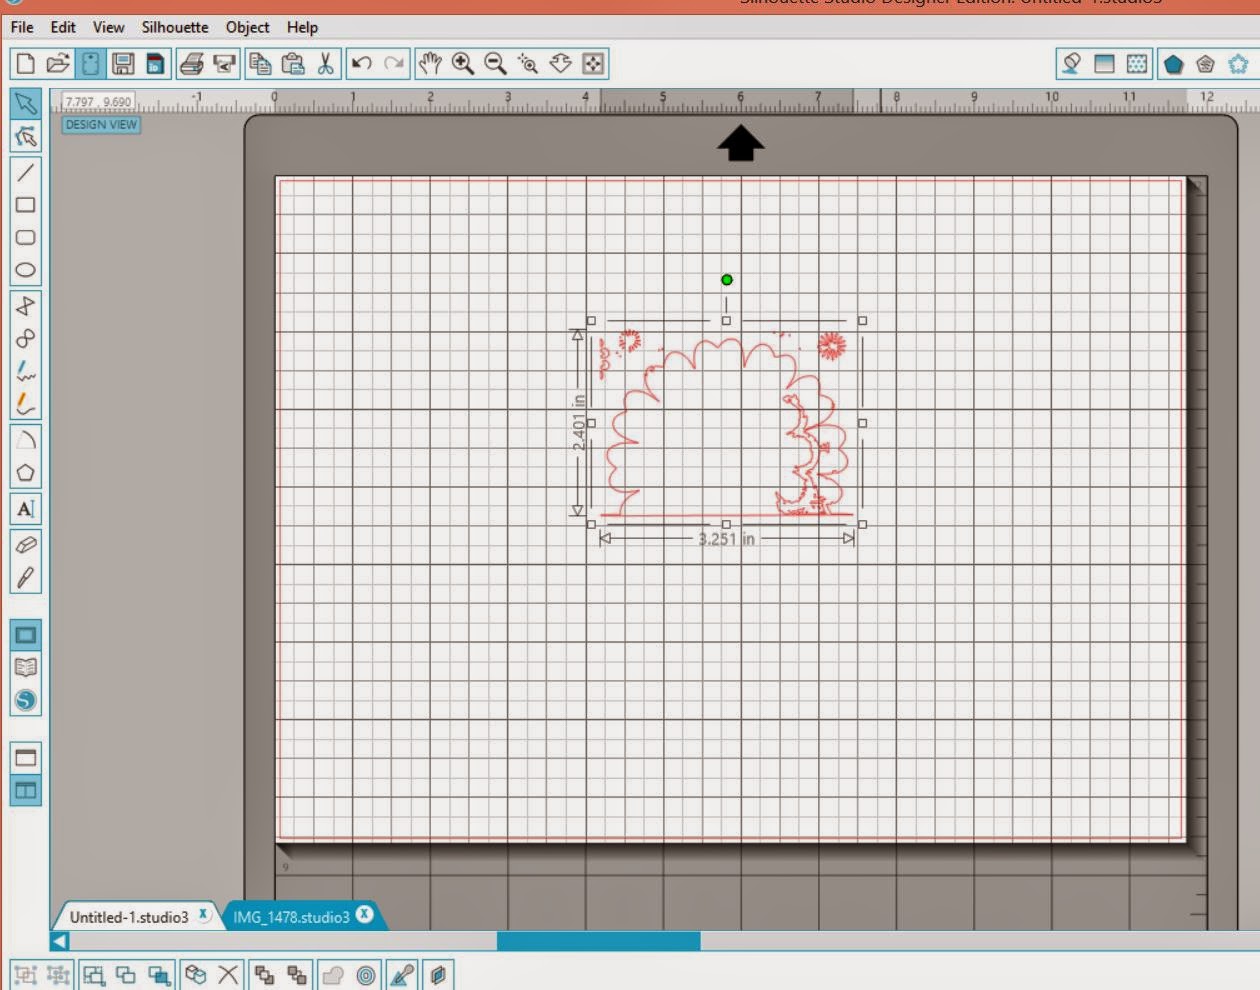
Choose "trace outer edge, and then copy the traced area to a new sheet.  It may be imperfect, like mine.  If so, you will want to zoom in, erase what you don't want cut, and edit the points to clean the trace area.

My imperfect trace:


Here I use the erase tool to get rid of the parts I do not want to cut:


The clean trace image now looks like this:


Once that is complete, select all of the cutting image and choose "Make Compound Path".  Copy the full image and go back to the PixScan image screen to paste the cut image back over the part you are going to cut.


Next, if you want a border around your image rather than cutting up against the edge of your image, use the Offset tool.  I created an outside offset of .035".  In this case, I then cut the bottom part off using the knife and deleted it since it's the edge of the paper and doesn't need to be cut.


After you have finished putting the traced image around the image to cut, repeat this for any other images on the same paper that you want to cut at the same time.

Finally, insert the PixScan mat with the paper you took the photo of in step 1 - make sure you don't move this paper after taking the photo!  Choose the "Send to Silhouette" button and adjust your cut settings as needed.  The machine will take in the PixScan mat, look for the registration marks and begin cutting your images.

That's it!

This will save you a lot of time and paper, especially the more you cut at one time.

I hope you enjoyed this tutorial!

Majken

Tuesday, April 8, 2014

Card Sketch: You Are My Happy

Hello fellow choco/scrappy friends!  Today I wanted to share a card with you, one I created for the Practical Scrappers card sketch for April.  I love Basic Grey, and when I saw the sketch by Christine Meyer, I knew the Mon Ami collection would be perfect for it.


Here's the "You are my happy" card that I created with it:


I took the gray paper and cut a 4.25" x 6.5" piece for the card base.  I cut the flower paper (2.75" x 4") and the green paper (3.5" x 4") and adhered them to the gray base.  I then stitched twice in dark gray thread around the inside of the rectangle created with the two pieces.  Next I cut a strip of the orange paper (5/8" x 4.25") and adhered that over the seam of the two pieces.

I put a piece of Fancy Pants Artist Edition filter paper (pinking edge) in the center and then stitched lines from the center in dark orange thread to create a sunshine effect.


Next I fussycut several of the flower clusters from the patterned paper and layered them over the center using 3D pop dots.  I cut a flower for the center using gray paper, green paper, a punched flower, and an orange circle from the paper.  I inked a few of the edges and used a 3D pop dot to include it as my center layer.


To finish the card, I stamped "You are my HAPPY" (from the Close To My Heart National Stamping Month special stamp set from 2013) in Juniper ink in the bottom right corner rather than the top center since I used a patterned paper on the top.

I hope you liked my rendition of the sketch.  I'd love to see what you make with it and what papers and color combinations you choose.  Share the sketch and link up what you create on the Practical Scrappers blog or Facebook page.

Have a super, chocolate/scrappy-filled week!

Majken


Thursday, March 20, 2014

Giveaway! {Paradise} - A Practical Scrappers Scrap Your Stash Blog Hop

Hello and welcome to the Practical Scrappers "scrap your stash" blog hop!!  You should have arrived here from Patty Selah's site (her cards were lovely!).  How about a $20 GIVEAWAY to keep the fun going?  Check out my tropical project and learn more about it at the end of this post.

Today I'm sharing my "Paradise" layout highlighting some photos from a family trip a few years ago.  I used some Bo Bunny "Barefoot & Bliss" stash I saved because the colors just POP - they're gorgeous!  They also go perfectly with tropical and water photos.  I think they also do not need a lot of embellishing, so I kept my layout simple...what do you think?


I started off with my CTMH Outdoor Denim cardstock base, and I used the Bo Bunny hibiscus patterned paper as the main background.  To add dimension, I created a "header" above it.


I started the header with a 1.5" x 9.5" strip of CTMH Lagoon cardstock, and I cut along the full strip with my Martha Stewart fringe scissors.  Above that, I layered a thin strip of the hibiscus paper and a scalloped strip of misted white cardstock.  I stamped the "paradise" definition on the left and adhered it all together.  I faux stitched in white above the header, and I stamped and fussy cut some flowers to layer on the right-hand side.

I layered my two photos over the hexagon patterned paper, distressing the edges, and then layering over CTMH Outdoor Denim cardstock.


I balanced the layout with a footer on the right hand side using a scalloped strip of white cardstock misted with Juniper reinker, which I adhered and did the faux stitching in white below.  I journaled on grid paper stamped 2nd generation with a hibiscus flower stamp, inked the edges, and adhered onto the hexagon paper and Lagoon cardstock.  


I finished the layout adding a button and some raffia palm tied with ribbon to the footer, and adding some gems above the header.  I hope you felt tropical on today's blog hop!


***Giveaway!***
  
I'm giving away one $20 e-gift certificate to the Two Peas in a Bucket online store!

All you have to do is:
  1. Become a member of my blog with Google Friend Connect or Bloglovin AND
  2. Leave a comment on this blog post - would love if you share your favorite spring memory or tradition :)
Easy, peasy!  You have until Monday, March 24, 2014 at 9am CT to enter for your chance to win. International entries are welcome. I will randomly choose one lucky winner and announce it here on my blog on Tuesday, March 25, 2014. Good luck, and thanks for visiting!


Now head over to the very talented Jennifer Haggerty's blog for your next stop.  Isn't her layout FUN?? Those glasses are a hoot!

Friday, January 31, 2014

Bon Voyage! A Scrappy Time Warp...

You know that time in 1999 when I became a "DOTS" (now Close to my Heart) consultant so I could earn money for my wedding?  Yeah....I did earn money, but I spent my fair share, too (on crafty goodies, of course!).  I couldn't get enough of the stamps, papers, inks, and accessories.  I kept up with my pre-wedding pages somewhat, but then...IDon'tKnowHowButItGotGroupedInAStorageBoxForLater.  It was like the crazy aunt you don't want to acknowledge.  Oh sure, you know it's there, but you repress the thought because: new house.  Baby girl.  Life.

Fast forward to October 2007 where Heather Leopard and a couple other of my friends go to a scrapbooking retreat.  I bring almost nothing except for wedding stuff to *finally* scrapbook!  I get quite a bit done, actually, and am very proud of myself.  Then.....well, you know -- TheWeddingBoxWentBackToItsHideyHole.  

Now it's 2010 on this scrappy time-warp.  Heather and our friends decide to make our own retreat at a local Residence Inn, and we split the cost and food.  I grab my Wedding Box (and a few other projects) and voila....I get a little more done. But...BackToTheHideyHoleItWent.

Fast forward yet again to January 2014, where it's finally Scrapbooking Season.  Heather and I along with Krissy go to a bittersweet Archiver's crop (our last....still so sad....not over it at all....WAAAAH!).  I decide the easiest way to pack is to have specific projects in mind. So out came the Wedding Box O' Stuff.  And as I looked through it I realized I have successfully captured the pre-wedding (showers, bachelorett party, bridal portrait, etc.), the wedding AND the reception.  Success.  Progress.  Memories saved, ready to cherish.  But then my eye catches a Barnes & Noble bag.  I open it.  My eyes gleam.  Because it is....the honeymoon.  With notes. Sidenote:  my husband actually teased me about taking notes on what we did each day of our honeymoon, but wow, I'm so grateful I did!  I never once thought I'd be scrapbooking my honeymoon almost 14 years after the fact, but guess what?  I'm really glad so much time has passed because scrapbooking has come a very long way, my friends.  A looong way. 

So.

My husband and I went on a cruise for our honeymoon.  Wanna see my Bon Voyage layout?  Okay then, check it!


I had so much fun creating this layout.  I used Fancy Pants Designs' Happy Go Lucky collection because the colors were sooo happy, and they called my name.  I wanted to pick up that light blue color and happened to also have two sheets of an older Fancy Pants collection, The Daily Grind.  I loved the hexagons and decide to use most of the hexagon paper on the right page.  But I wanted to carry the shape over, so I cut out a large hexagon with my Cameo, traced it onto the left hand page, and then sewed the hexagon onto the right hand side of my left page.  You can see the top of it here.  


Don't we look cute holding our beers and giggling during muster training?

I love the striped paper too, so I used that in the top border of my left page as well as the banner on my right page.


I mat the photos on the left page with CTMH Colonial White cardstock and the photos on the right in red Fancy Pants cardstock.  To add dimension, I distress the light blue cardstock on the right page and sew along the top and bottom.  Under photos on both sides, I layer CTMH Cocoa cardstock, the ticket patterned paper, and some chevron vellum by Studio Calico.

I use a tag from the Happy Go Lucky collection to journal on, and for my title I decide to cut out "Bon Voyage" on my cameo, except for the "O".  Instead, I fussy cut the hexagons to use as my "O".


After I adhere the title, I sew over the "BON", and then add the Maya Road "love" clip over the center of the "O".  Finishing touches are the arrow stamp and the "Epic" stamp.

I have more honeymoon to show you, but for now, our scrappy time warp comes to an end.  I hope you enjoyed the layout.

Chocolate scrappiness,

Majken Pullin

Monday, August 5, 2013

Heart = Melted

Happy Monday everyone!  Well, as happy as it can be for a Monday.  :)

So, I mostly create double-page layouts, and the one I wanted to share today is no exception.  My son said the most wonderful thing to me not too long ago, so I wanted to document it - it totally melted my heart.  I didn't have specific photos for that moment, so I printed a couple of recent ones with him that I really liked.


I took two pieces of CTMH Whisper cardstock to use as my base, and I used a dotted foam stamp with Slate ink randomly across both pages in first and second generation to create a darker and lighter pattern.  Next, I decided to give the pages some texture using Tsukineko's Goosebumps Clear Texture Spray, and then let it dry.

After I laid out my photos, other pieces of cardstock, and Studio Calico's Darling Dear chevron vellum, I adhered the heart to the cardstock leaving a few gaps.  To cover the center of the spiral, I used a scallop circle, a star flower, and a brad.  I cut out an arrow from the heart to the word "Melted", spelled out using Heidi Swapp's awesome clear mint alpha letters (not for the first time!).


Isn't the heart cool?  I was inspired by Melinda Spinks' layout she did for Little Yellow Bicycle.  Her rendition had more pieces, more patterns, and was feminine, so I just adapted it for my boyish purposes.  I first sketched out the heart on the back of the patterned paper that I chose.  In this case, I used My Mind's Eye Collectable - Notable collection, which I fell in love with when I first saw it.

I then cut out my heart, used a pencil to lightly sketch the swirls from the upper left side of the heart, and then cut on the swirls, careful to keep each piece in order.


I absolutely had to journal our conversation that made my heart melt.  He certainly can be a handful sometimes, but my son can definitely be a sweetheart.  

I hope you are inspired by my layout.  Happy scrapping!

Majken