Thursday, December 29, 2016

{Christmas Box} Scrapping Our Stash Blog Hop

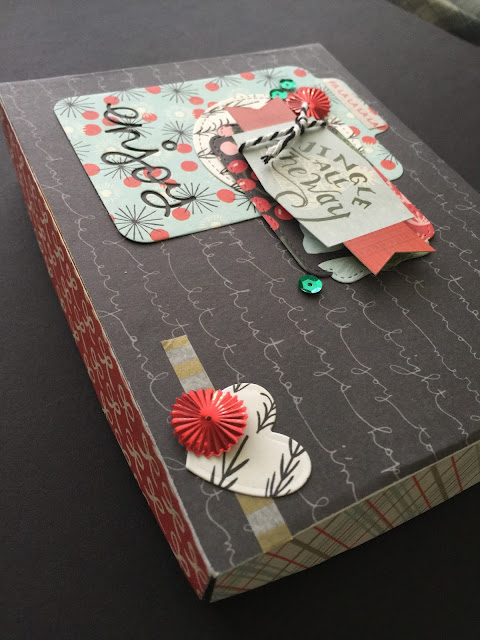
Hello everyone!  You might have arrived from Sandy's blog.  I hope your holiday has been wonderful so far.  If you give gift cards, it can be hard to figure out how to package them.  I often worry an envelope will get lost.  Plus they just aren't as fun to open, are they?  But then you have to wrap.  Well, I have a solution for the best of both worlds.  I kept a chocolate box from a few years ago because I knew I could find something fun to do with it.

And I dug into my Christmas collection stash of BasicGrey's Juniper Berry.  It's so beautiful (gosh I miss their papers!).  I came up with the following:


I just love the colors in the collection.  Simply gorgeous!  Here's a better view of the top of the lid:


And here's a view of the box from the side:


The original box:


Thanks so much for hopping along!  Next up, hop over to Lyne's blog to view her lovely Tiny Toes layout!  See you soon.

Majken

Materials:

  • BasicGrey Juniper Berry papers, stickers, and sequins/embellishments mix
  • Heart and stitched cirlcle die cuts - Lawn Fawn "Stitched Party Banners"
  • Folder die cut - Sizzix "Hello Life" by Lori Whitlock
  • Enjoy and stitched circle die cuts - Lawn Fawn "Small Stitched Envelope"


Full hop list:
Wendy Bergeron Coffman - http://www.stampingrules.com/2016/12/scrapping-our-stash-december-blog-hop.html
Sandy Ross - http://itsafamilyaffairwithscrappynana.blogspot.ca/2016/12/dear-santa-visiting-santa-scrapping-our.html
Majken Pullin - http://chocoscrapaholic.blogspot.com
Lyne Schnable-Blodgett - http://lynnseverydayideas.blogspot.com/2016/12/tiny-toes.html

Thursday, December 1, 2016

{This Boy} Creative Scrappers December Reveal Blog Hop with Spiegelmom Scraps!

Hi Everyone!

Creative Scrappers is hosting a BLOG HOP today in conjunction with our reveal for sketch 301 and our sponsor Spiegelmom Scraps. I hope you can take a few minutes from your busy day and join us!  Here is sketch 301 - it's fabulous!


And here is my take on the sketch showcasing some fun embellishments from December sponsor, Spiegelmom Scraps.  I used:


As soon as I saw the sequins, I knew they matched Crate Paper's Cool Kid collection.  And since I hadn't yet scrapped Paxton's first day of second grade, the perfect plan came together quickly -- that's why I love sketches so much!

Here are a few close-ups.  The chunky cork heart works perfectly with the trimmed doily.


I love those aqua circular sequins in the pack!  And the daffodil sequins go well with the Crate Paper Cool Kid star clip.  And the little cherry bomb sequins accent everything perfectly!!


I used Creative Scrappers cut file "Slice of Cheesecake" to create the triangles that fit in the doily.  The triangles go with the triangle papers!


For my title, I used The Cut Shoppe's "Open Letter Alpha" cut file.  You can see another cork heart and more fun sequins from Spiegelmom Scraps.


Here's the order for today's hop!  I encourage you to make a stop at all the other designers' blogs for more eye candy!!


Majken Pullin       ***you are here***

Please take advantage of this coupon on your next purchase


Enjoy our reveal this month and please visit us on Dec 15 for another blog hop with
the design team members from SMS!

Tag us using #CreatingWithSketches and #Spiegelmomscraps 

We will also have a great prize for one of our participants
as well as a copy of the NEW Creating With Sketches V4!

Your next stop on the hop is Marielle LaForge-LeBlanc.

Have a great day!
Majken

Tuesday, November 1, 2016

{2 Cute} Creative Scrappers Sketch 300 Design Team Reveal - Clarity Stencil Brush technique

Hello everyone!  Welcome to November.  I can't believe it's November either.  Lots to do in the next two months!!  But first, grab just a few minutes and a tea or coffee to see a new sketch from Creative Scrappers.  It's a fabulous grid design!


This month's partner is My Creative Scrapbook, and I opted to create with their October Creative Kit which has a lot of Doodlebug Design Flea Market.  The colors are so bright and cheerful!  I chose my kitty Oreo as my layout subject.  

The first thing I did was cut the Creative Scrappers Lucky Stars cut file from textured white cardstock, peel out the star cuts, and then sew over another piece of white cardstock.  On the top, I created a border from a strip of paper with clouds and sewed over it as well.  See the lightly inked star?  I'll share how I did that later in the post.


Then I trimmed my photos and started creating my grid.  I used a few of my die cuts to create with:  Papertrey Ink's Noted: Scalloped Square and Technique Tuesday's Flair Maker.  Here's a little banner I made from the flair set.  You can see a couple more lightly inked stars...


Those faux stitch lines are awesome on the Noted set!  I added more machine stitching as well as a Heidi Swapp "noted" wood veneer from the kit...plus a couple of the white cardstock stars that were cut from the background.


How cute is this mouse in the bottom left corner?  And another grid square with some stickers, flair die cut, star, and enamel dot.


And a grid with a circle, some stickers, a star, the heart from the center of one of the flair banners, and another enamel dot.  More lightly inked stars in the background...


I used my Cameo to cut the title "2 cute".  I layered the other centers of flair to use as flower centers, then added more enamel dots.  


Can't forget the cute birdie in the top right corner looking over my kitty!  I used 3D foam tape to pop up one of the cloud stickers.


I used the typewriter for a cute journaling spot!


Once I had the grid layed out most of the way and before I adhered everything, I chose a few stars to lightly "paint" with ink using my new Claritystamp Clarity Stencil Brushes - they ink so gently and subtly for a beautiful finish - though you can add heavier ink if you wish just by adding more ink and brushing repeatedly.  I used CTMH Lagoon, Pear, and Creme Brulee.  And then I glued the stars into a few places left open in the cut background where I wanted them.

Here's the wonderful sketch Kristine created:


That's all for me, creative sweeties!  Don't forget to head over to the Creative Scrappers blog to see the other designers' takes on the sketch.  And create your own layout to link up!

Have a great week!

Majken

Friday, October 14, 2016

Happy Announcement and a Card

Hey there creative types!  I just realized I never posted a happy announcement nor a cute little card I made for World Cardmaking day, so I thought I'd pop in to share.  

I've been invited back for another term with Creative Scrappers, and I'm over the moon about it because I love Kristine's sketches!  Here's the full Design Team.  Our first reveal is November with sketch 300 - you'll love it, so check out the blog Nov. 1st!


World Cardmaking Day was October 1st.  I didn't get a chance to do a lot of crafty things, but I did make a card.  I used American Crafts Oh Happy Life.  Isn't this owl cute??

Until next time, my friends - don't forget to have a bite or two of chocolate.  See you soon!

Majken

Saturday, October 1, 2016

{Every Summer Has a Story} - Creative Scrappers Sketch 299 Reveal

Happy October, y'all!  Today I'm sharing a fun multi-photo layout for Creative Scrappers sketch 299 reveal.  I had so much fun creating this layout - all the goodies from Cocoa Vanilla Studio (including the star cut file!).  This gave me the chance to scrap some more photos from our trip to Banff in June.  Here's the full layout.


 The blue and green paper goes so well with my photos, and I opted to include some of the orange papers for just a bit of contrast.  I used some Distress Ink to watercolor some of the stars in the paper and created a strip for the right of the photo area as well as for part of my title.


 I cut out and distressed the colored papers, then sewed along the edges of each.  I used some Color Shine sprays to drop some ink splatters as well - I had to custom blend a few different inks to get the right orange color!  For the stars, I cut several sizes of the Cocoa Vanilla Studio star and then sewed each one.


I had some accents from Evalicious that matched as well - some arrows, stars, and a phrase.

For the title, I downloaded the Every Summer has a Story cut file from Just Nick Studio.  I cut it out twice - once using white textured cardstock and a second time using the stars paper.  Then I trimmed the stars paper for the words I wanted, watercolored, and glued on top of the white title.  I popped up the whole title with 3D tape.


Finally I added journal strips with gray text.


Here's the sketch:


Head over the Creative Scrappers blog to see the other designers' layouts, and definitely create your own layout with the sketch to link up during October.

Have a great week!!

Majken

Saturday, September 10, 2016

Happy Day - with Clique Kits Cutfile and Simple Stories

Hello and happy day to you!  

Today I'm capturing my joy from when my family took me out for a Mother's Day brunch.  There was a wait, but it was so relaxing to sip my iced tea outside while we waited for our table.

How pretty is this free cut file from Clique Kits?  I used it on the striped paper from the Simple Stories Sunshine & Happiness.  Click the link above to grab the free cut file for yourself!


I spattered a few different inks on textured white cardstock, then while that dried, I matted my photo using the 6x6 paper from the collection and cut out the leaves wreath.

Once it was dry, I put the photo area down and sewed over the wreath once.


I added some stickers, New Bradz, and enamel dots onto the main area.

Next I trimmed a couple of the pocket cards from the collection and sewed along the top, adding a sticker and another New Bradz.


The journaling was quick using one of the journaling cards from the 6x6 paper pad.


I popped up the stickers "ENJOY" to put on the bottom.


And then I used a sewn strip on the top right with a New Bradz to balance with the rest of the layout.


Now go grab that cutfile and share what you create with it!

Thanks for stopping by.  Hugs!!

Majken

Thursday, September 8, 2016

Happy Little Reader - Quilted Background with Creative Scrappers Cut File

Hello and thanks for stopping by!

Today I have a layout showcasing a quilted background inspired by and used with Kristine Davidson's cut file for Creative Scrappers called Square Space.  Go grab the great cut files from Creative Scrappers, and keep reading to grab a free title cut file.  I also was inspired by my friend Heather while scrapping with her recently - she created a quilt-inspired background too last month.

I decided to use my Simple Stories Bloom & Grow goodies - that collection has such a great combination of colors!! And it went well with photos of my almost-8-year-old son and his nightly reading obsession.  <3  I'm just sorry the little gnomes didn't go with the photos.  ;)


To create the background, I first cut the Square Space background from textured white cardstock.  Next I used the 6x6 paper pad cut many of the patterns into squares a little larger than the openings.  I then cut the squares across diagonally twice to get four triangles from 1 square.  

I then just started piecing together the papers so no two were directly next to each other and adhered them.  I stitched along the background "lattice" to complete the quilted look.  This technique was well worth the time of cutting and piecing.

Because the background was so intricate, I opted for fairly simple for the rest of the layout.

I used leftover 6x6 pieces to layer behind my photos of Paxton.  Some ephemera (how cute is this sun?!), a few New Bradz, and some stickers complete the photo area (along with some 3D foam tape).  Isn't it cute that the photo on the left includes a mark on his chin from sleeping with that book?  It's his very own "bookmark".  ;)  His reading tastes run a little old because of big sister, so he's already reading middle school chapter books.  Did I mention he's been a bookworm from a baby and taught himself to read? 


So next I was going to put a journaling spot, but I came across this fabulous quote that fit perfectly.


I printed it out after matching the ink to the paper collection using a scrappy tip I've shared before.  Then I matted it with more papers, ephemera, and a New Bradz.

For my title, I used Silhouette Studio to type each word in a different font and then welded them together.  I've loaded the cut file to my Google Drive so you can grab it and use it if you'd like! I printed the full title out with white cardstock and then printed it again in the blue polka dot paper to adhere to and help "happy little" stand out from the background a little easier.  Those shadows just can't be avoided when you use 3D foam tape to pop up the words!  


I used some stickers to put the "summer 2016" below the title.  I also scattered some enamel dots at the intersections that didn't already have something on them.


And that's a wrap on today's layout.  I hope it inspires you to create your own quilt-like background - if so, do share with me here or on Instagram.  I'd love to see your creation!

Have a super weekend...hugs and chocolate.

Majken

Thursday, September 1, 2016

Absolutely Amazing - Scrapping Our Stash Blog Hop

Hi and happy Friday!  Today is a blog hop where we highlight projects using our older stash.  You might be here from Wendy's blog - if so, welcome!  If not, you can see the full list below to make sure you see all the designers' projects.

I'm digging back into my BasicGrey Vivienne stash again (that's how much I have of it, y'all!!), because I had so much fun creating a layout a couple of months back using the same collection!  I had some of the pieces from the Delicate Floral cut file left and decided to use them with another photo from the same series I had printed of my daughter at five years old.


The brown cardstock was left over from the flowers I cut for the last layout then backed it with white cardstock.  I decided to cut the insides of the flowers slightly offset on the inside to leave a white edge.  Then I started filling in the pieces.  I watercolored the stems and leaves lightly with green ink.  

This time instead of green grass, I used gold thread for my zig zag grass blades.


I did fill in some areas with enamel dots, like the center of the flowers.

The left bottom was made for an embellishment area.


I used one of the frames, some stickers and enamel dots and sequins, and sewing.

I used acetate shapes, paper, frames, stitching, staples, sequins, and ephemera to help frame my daughter's pretty face.  The 6x6 papers are perfect for matting.


I still felt like something was missing, so I found a bumble bee cut file, backed the wings with vellum, and dotted it with gold ink and backed with pop dots to help it stand out from the background.  Some more gold stitching to show its flight path helped tie it together!


That's my layout!  I hope you get some inspiration to use some cut files and machine stitching in your next layout!

Now head over to Alison's blog to see what she created!

Have a wonderful weekend, and don't forget to include some chocolate.


The full blog hop list:


Our New Happy Place - Creative Scrappers Sketch 298 Design Team Reveal

Hello, hello, lovely scrappers out in scrappy-land!  I hope you have come with a serving of chocolate to see what I (and the rest of the Creative Scrappers Design Team) have designed for you today.  This month we are partnering with Cuts 2 Luv, makers of some really fun badges!  I've used a few on my layout for this month.

In June, our family made the extraordinary trip to Banff, Alberta, Canada.  It was absolutely stunning - our favorite vacation we've ever had the fortune to have.  So much so that it is definitely our new happy place.  For real...we are already hoping to go back. 

So today's layout is in honor of this new happy place of ours.  The photo I chose of me and my husband was perfect to pair with various blues.  I pulled two pieces of paper from the Echo Park Summer Party collection - the ombre "swimming" paper (which is the largest circle in the center) and the pink/blue solid paper - I used the blue side of course.  Here is the full layout: 


To start, I took a piece of AC white textured cardstock and cut a circle from it using my Cameo - it was about 7 1/2" in diameter.  At this point, I played with many different papers and thoughts - it took a while to come together.  Does that ever happen to you?  I hope I'm not alone!  In any case, I settled on using a piece of ombre cardstock from Echo Park's Summer Party called "Swimming Fish" (the B side) and layered that behind the cut circle.  Next I used my Tim Holtz Distress Inks to watercolor the trimmed left edge of my white cardstock.  I layered 4 different colors to help blend the blue from the sky in the photo to the patterned paper and the navy pieces (Dark Blue paper also from Echo Park Summer Party).


To finish the circles, I cut a smaller circle from vellum with gold stars as well as a thin circle from the dark blue paper.  Then I got to stitching!  I used gold thread to stitch around the circles, along the left edge, and in the embellishment area in the bottom left (shown above).  I love that "love" badge from Cuts 2 Luv above and the blue ombre one shown below.


Here's a quick look at the stitching on the left as well as the journaling area.  I used several pieces of ephemera from the Pink Paislee Citrus Bliss.


Here's a peek at our "perfect photo" and my title.  I used alphas from BasicGrey Urban Luxe and Simple Stories then cut the "happy" using my Cameo.


Take a look at the top right embellishment area.  I used "beautiful" from Citrus Bliss and BasicGrey alpha to create "Banff".  I stitched some more and then added some acrylic stars and enamel dots.


Here is sketch 298:


That's all for me - now go create your own version to link up on the Creative Scrappers site.  We'd love to have you play along!  And please check back with the Creative Scrappers blog on Sept. 15th to see what the Cuts 2 Luv team creates!

Have a lovely week and Labor/Labour Day weekend if you are in US/Canada!

xoxo,
Majken


Materials used:
Papers:  American Crafts, Echo Park Summer Party
Distress inks:  Salty Ocean, Evergreen Bough, Faded Jeans, Scattered Straw
Embellishments:  Cuts 2 Luv, Pink Paislee Citrus Bliss, Simple Stories I Am, Jen Hadfield Home Made, American Crafts
Alphas:  BasicGrey Urban Luxe, Simple Stories
Other:  Gold thread, unknown vellum; Gems - Queen & Co and CTMH