Showing posts with label PixScan. Show all posts

Tuesday, April 5, 2016

Using the Silhouette PixScan Mat to Create Minc Foiled Words and Shapes

Howdy crafters!  I have a fun tutorial to share with you today using the Silhouette PixScan mat (here's a tutorial on how to calibrate PixScan for your camera if you are just getting started).  I got a Minc Mini for Christmas (thanks Santa!), and because my HP OfficeJet printer recently passed into printer heaven after years of good service, I spent a little extra money and got a LaserJet printer recently.  I work from home so the extra quality is nice, PLUS because it uses toner, I can now use it for foiling - win-win!    The possibilities are endless!

What you'll need:

  • Laser printer (available at printing shops like Kinko's etc. if you don't have one; or purchase Minc toner sheets)
  • Cardstock
  • Silhouette digital cutting machine (I use a Cameo)
  • Silhouette PixScan mat
  • Silhouette Studio software
  • Heidi Swapp Minc and transfer folder
  • Foil

First I typed some words in different fonts and included some icons from an shape font to print out onto a sheet of 8 1/2" x 11" cardstock.  I wanted "adventure" to complete my layout title but I didn't want to waste cardstock and I know I'll use the other icons somewhere so I added several to print!


The next step is putting the sheet on the PixScan mat and importing it into the Silhouette Studio software.  Remember to take the photo as straight on as possible and in good lighting.  

Tip:  Mine gave me the error "cannot detect the PixScan markings" several times.  After several takes, I rotated my mat 180 degrees so the arrow was pointing down like you see below, and it worked (I suspect a lighting issue).  Below is the photo I used to import to Studio.  

Note:  it ignores everything outside the mat, so it's okay if other stuff is in the photo.

Note 2:  Once you have a photo imported, it's very important to NOT remove the cardstock from the PixScan mat because it sees the images based on their position to the mat's registration marks.


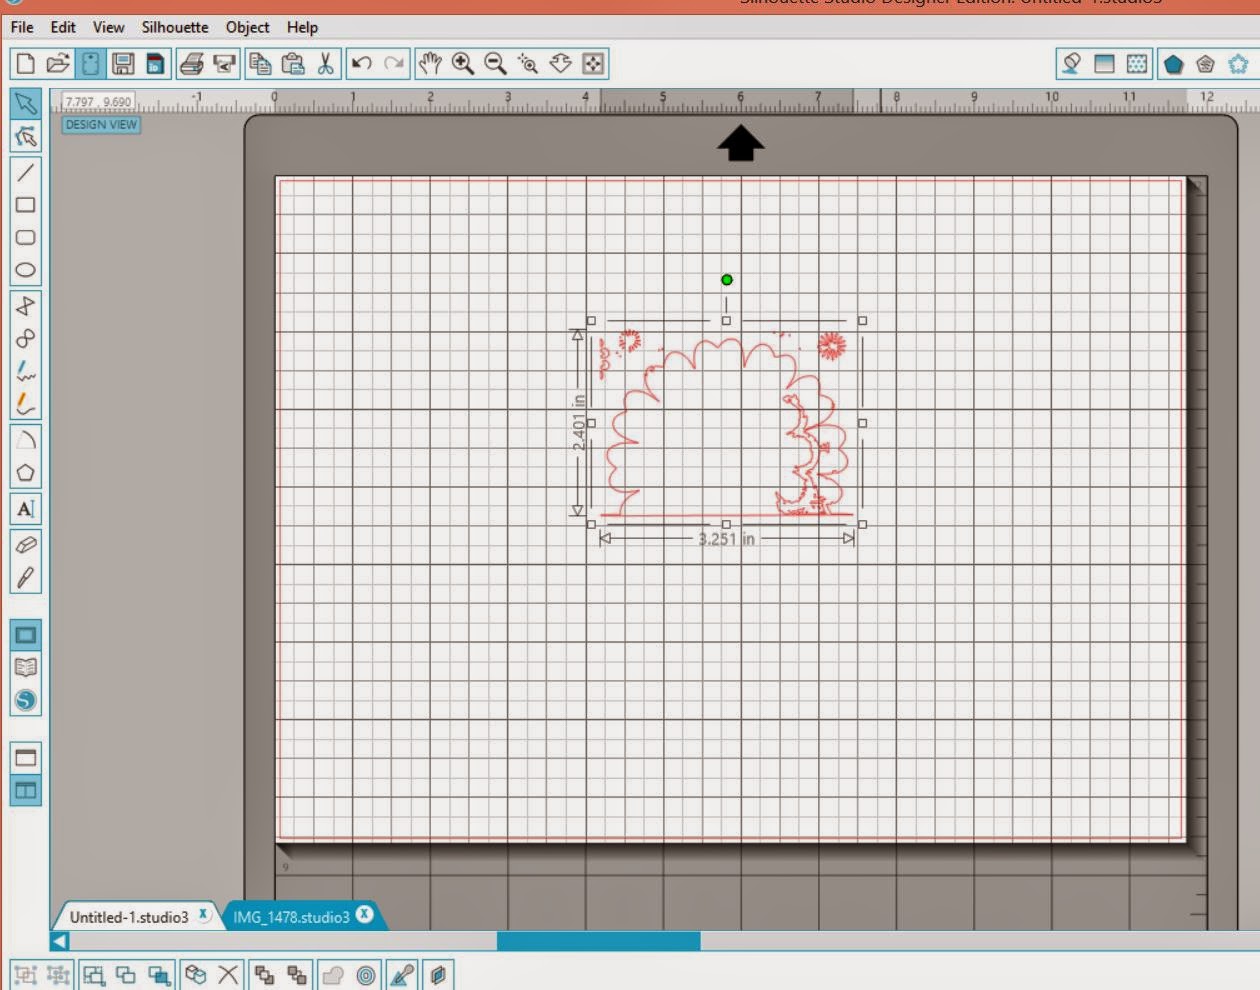
Here is the photo after importing (it turns the mat arrow the correct way on its own):


The next step is to trace the images. In this case, I turned High Pass Filter off and traced.


Next, I copied the red traced elements onto a new drawing area so I could zoom in and fix any trace errors by editing points, etc.  


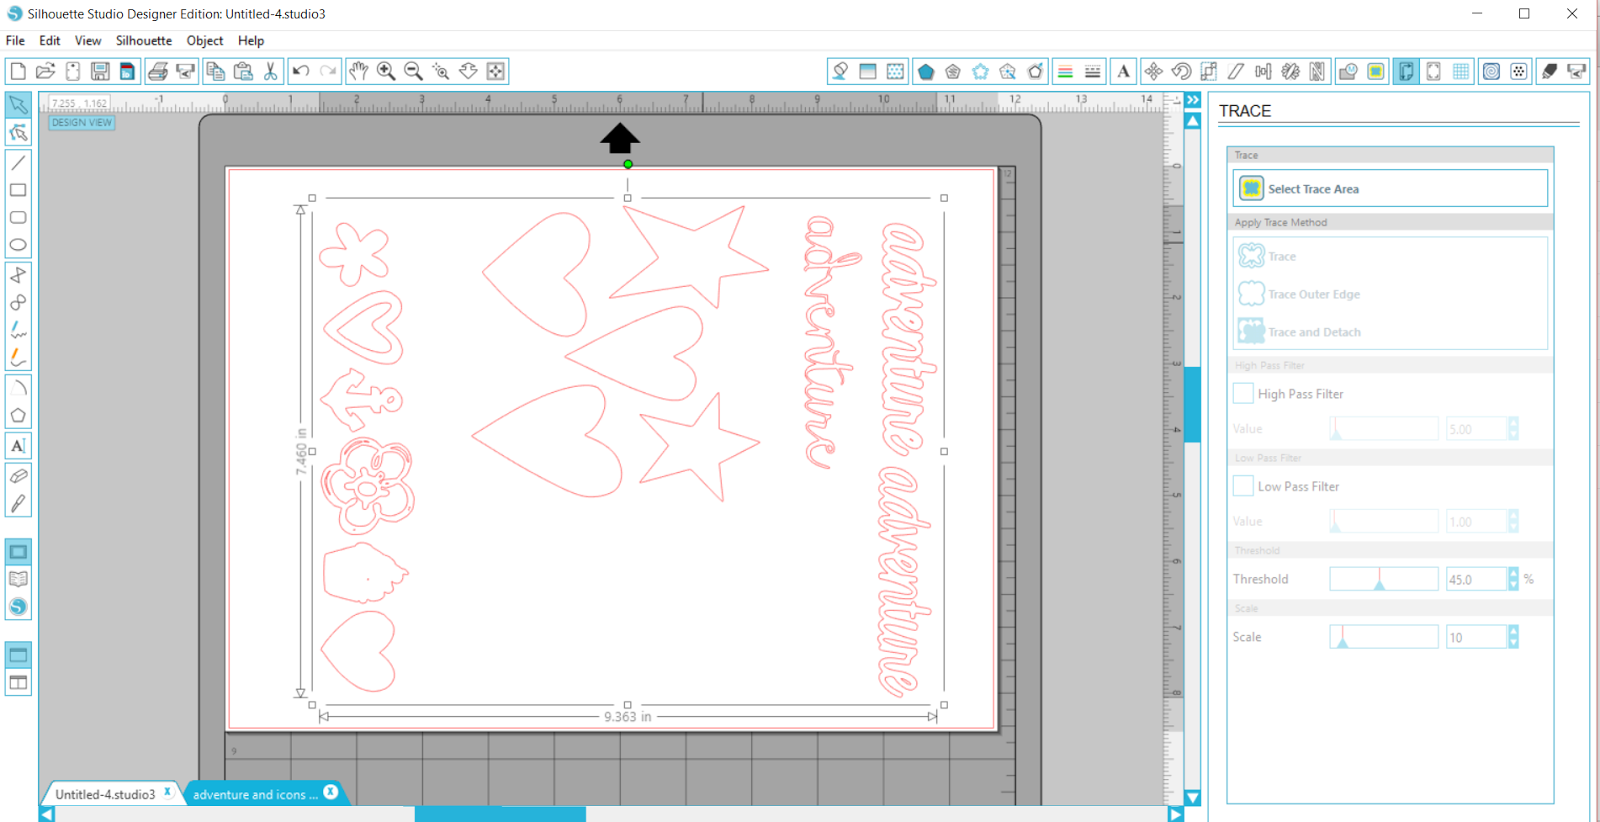
Once all of them were fixed, I created a slight internal offset for the full sheet, cleaned it up, and copied the traces back onto the PixScan mat drawing area.

Tip:  The internal offset helps account for slight variations based on the photo of the images on the PixScan mat.  If you'd rather have a border cut around your images, then you can create an external offset.


The next step is sending this to the Silhouette Cameo to cut.  Once they are cut, they are ready for the Minc!


I took two "adventure" words, a heart, and the anchor to the transfer folder for my Minc.  I turned my folder over to make sure all my pieces were covered with the gold foil.


Then run it through the Minc (I used setting 3).


The outcome?  Foiled goodness!!  And this fun layout.  

I'd love to see what you create with your PixScan and Minc!

Thanks for sharing, pinning, and your feedback!  Happy scrapping and crafting!

Majken

Sunday, October 25, 2015

PixScan Tutorial - Cutting out Stamped Images {Hello Friend Cards}

Hey there everyone-

I'm back with another PixScan tutorial to show you how easy it is to cut out stamped images.  If you are just getting started with your PixScan mat, I have a PixScan calibration tutorial that may help you.  And I recently created a layout showing how you can digitally fussycut images out of patterned paper.  Today's tutorial is similar but can be applied to stamped images so that you can quickly and easily cut multiple images...which is very handy if you are mass-producing cards.  For today, I wanted to create a set of fun cards to send to friends.  

Note:  I use a Silhouette Cameo in my tutorials.  Materials listed at the end, but if you like the paper, I also used it in this layout.  It's such a pretty collection, and it pops when combined with black and gold!


The first thing I did was stamp my words out on white cardstock, and placed the cardstock onto the PixScan mat.  Take a photo of the mat - make sure you are as straight as possible and that you get the full mat in the photo so you capture the registration marks.  Save the photo to your computer and import the photo into the Silhouette software.


Here's what mine looked like:


The next thing to do is to trace the outer edges of the image(s).


Next, copy the traced images onto a new file so that you can work with them.


To create an edge around your image, do an offset.  I used an offset of 0.05".  


The next step is to clean up the offset points.  Sometimes you have outliers or need to smooth out curves.


The next step is to remove the inside traces off the cutting area, leaving the offset images in the cutting area.


Select the offset image and copy it, pasting it back onto the original file with the PixScan image.  Zoom in on the image to make sure you have the stamped parts in the center of the offsets.


The final step is to send the file to be cut on your machine.  Make sure you have not moved the paper on the PixScan mat between the time you took your photo and the time you will be cutting because the cuts depend on exact placement on the PixScan mat.


This technique will be great for Christmas cards!

For the "friend" and "birthday" banner pieces, I stamped using Black Stazon ink on watercolor paper that I brushed with coordinating colors to the collection.

Card 1 with close-up:


Card 2:

Card 3:

Tip: to get more out of your specialty papers, use paper punches to punch out areas that will be hidden.  The vellum circle in the card above was punched from the piece that my photos are matted on in this layout.  The photos hide the cut-out circle!


 Card 4:

Card 5:


If you use your PixScan mat for cutting out stamped images, I'd love for you to share them with me.  Thanks for stopping by!  

Majken


Materials:
  • Paper, vellum, and puffy stickers:  Dear Lizzy Documentary collection
  • Stamps:  Close To My Heart "Hello, Life" stamp sets (September 2015 special)
  • Die cuts:  Lawn Fawn "Stitched Party Banners" (cards 1,2, & 5); Technique Tuesday "Pocket of Love" (card 5); Sizzix Lori Whitlock "Hello Life" (card 4)
  • Inks:  Stazon (Black); Tim Holtz Distress Inks (Spiced Marmalade, Spun Sugar, Mustard Seed)
  • Other:  gold thread; American Crafts Peony Ribbon


Tuesday, April 14, 2015

Silhouette PixScan Tutorial - Fussycutting Images

Hi everyone!  

Today I wanted to share a tutorial on how to fussycut images using the Silhouette PixScan mat.  It's fairly easy, and if you have a lot to cut, it can be a huge timesaver!

Note:  If you haven't calibrated your PixScan mat for your camera, here's how.

My tutorial will show how I cut the doilies for my Disney World visit with my favorite Hundred Acre Woods friends.  So let's get started!

The first thing you want to do will be to place the paper you want to cut onto the PixScan mat.  This can be a patterned paper or a paper with stamped images you want to cut.  Next, take a photo of it on the mat using the camera you have calibrated.  Make sure the entire mat is in the photo - it's okay if there's other stuff in the frame as well (like my black posterboard I had underneath the mat in the photo below).  Save the photo in a directory on the same computer where you have Silhouette Studio software.


Next, open Silhouette Studio and choose the "Open PixScan Image".


On the right-hand side, the PixScan menu appears.  Choose Import from File, browse to where you saved your PixScan image, and choose it.


This imports your image and you will see something like this:


Your next step is to open the trace window.  


Then select the image you want to trace for cutting.


Next, select High Pass Filter range and the Threshold range to get as smooth and solid a piece as possible for your cutting edge.  For this doilie, here's the ranges I had.  


Choose "trace outer edge, and then copy the traced area to a new sheet.  It may be imperfect, like mine.  If so, you will want to zoom in, erase what you don't want cut, and edit the points to clean the trace area.

My imperfect trace:


Here I use the erase tool to get rid of the parts I do not want to cut:


The clean trace image now looks like this:


Once that is complete, select all of the cutting image and choose "Make Compound Path".  Copy the full image and go back to the PixScan image screen to paste the cut image back over the part you are going to cut.


Next, if you want a border around your image rather than cutting up against the edge of your image, use the Offset tool.  I created an outside offset of .035".  In this case, I then cut the bottom part off using the knife and deleted it since it's the edge of the paper and doesn't need to be cut.


After you have finished putting the traced image around the image to cut, repeat this for any other images on the same paper that you want to cut at the same time.

Finally, insert the PixScan mat with the paper you took the photo of in step 1 - make sure you don't move this paper after taking the photo!  Choose the "Send to Silhouette" button and adjust your cut settings as needed.  The machine will take in the PixScan mat, look for the registration marks and begin cutting your images.

That's it!

This will save you a lot of time and paper, especially the more you cut at one time.

I hope you enjoyed this tutorial!

Majken

Sunday, February 15, 2015

Me & My Hundred Acre Woods Friends

Happy Sunday evening my scrappy friends.  I'm excited to share a layout today that I created using a some of my stash.  Now, let me tell you about my stash.  I have a problem.  I have a **VERY BIG** paper hoarding problem...ahem.  And I know I'm not the only one, but when the copyright year on the barcode strip of your paper is from 4 years ago, you know it's bad.  I have paper even older than that, but I digress!

Today I'm using a sketch from Let's Get Sketchy February Week 1.  In addition, I'm doing the Scrap Our Stash February stash challenge for WASHI -> my layout has: wooden embellishment, alpha stickers, splatter stamp, Hello Fall paper, and ink.  


This was such a FUN layout for me - I got to meet my very favorite characters in the whole world last Thanksgiving!  But with all the colors in the photo - including my purple shirt - I was having a tough time figuring out what papers to use.  Enter Little Yellow Bicycle's "Hello Fall" from 2011!


I only had about 5 sheets of paper from this collection and none of the embellishments.  So I decided to pull out my Silhouette PixScan mat to cut the flower/doilies from the middle of one of the papers.  If you don't have this mat, I highly recommend you get one!  It lets you cut out patterns, stamped images, and more.  Don't get me wrong, I don't mind fussycutting sometimes, but this can be a real time saver -- and paper saver, too!  (And if you are looking for help calibrating your mat, I have a tutorial that may help.)  

To start, I decided to flip the sketch.  My base paper has a built-in green strip, but I trimmed a strip from the leaf paper to adhere next to it on the right side of my layout.  Then I sewed along the left side of the strip.


I matted my photo with the green side of one of the papers, inked the edge in dark purple, then matted it again with the orange side of one of the papers (also inked).  I included a tab to highlight the date.  Then I included an embellishment cluster below the photo in line with the sketch.

I wanted to stamp the splatters using the Tim Holtz Spills & Splatters stamp (I trimmed the splatter area next to the cup rings to use separately).  So I put the photo area and the flower/doilies where I knew they'd be and stamped near each doily.  Then I adhered everything to my page to create my title.  I chose Simple Stories Sn@p! Studio Typeset alphas for "acre" and "woods" and stamped "hundred and "#friends" using my oldie-but-goodie Close To My Heart Solo Alpha sets.  I cut "me & my" using my cameo, and popped up the ampersand using 3D tape (hence the pesky shadow...one of these days I will learn how to fix this using Photoshop Elements!).  The doily on the left is also popped up.


After adding some gems, I finished the layout with a small journaling spot to show how special Pooh Bear and Tigger are to me.


I hope you enjoyed my layout today, and I hope it inspires you to reach into your stash - you just may not know what serendipitous goodies you will find!

In the famous words of Tigger, "T.T.F.N.....ta ta for now!
Majken

Sunday, August 10, 2014

Silhouette PixScan Calibration Tutorial for Cameo

Hello everyone!  Today I want to share with you some things I learned as I set up my Cameo to use the new PixScan cutting mat this weekend.  I think these tips will help you if you plan on using this new cutting mat and a camera (instead of a scanner).  Visit the following tutorials on using your PixScan once you've set yours up:


So, here's what you need:
The first thing you need to do after getting the new version of Studio is to click on the PixScan icon:


The PixScan area will show up with the PixScan menu area on the right-hand side.  Click on the arrow to the left of "Import from File".  Ignore my stamped images for now :)...


You will see the Camera Calibration area:


Click on the arrow to the left of "Camera Calibration" and click on "Show Calibration Test Card".


This will populate a dotted sheet in the drawing area:


You need to print this sheet out.  Now, when I printed it, there were a couple of rows that had dots not evenly spaced and it looked like my printer had messed up.  But I printed it out on another printer and it was the same, so I decided to try it.

Your next step is to place the printed calibration sheet onto the PixScan mat and then take a picture using the camera you wish to calibrate.  Make sure you are on a flat surface and you take the photo as straight-on as possible.

Important!  For this step, you next need to go into your photo and crop it so that the photo is ONLY the dotted area (no mat or anything else included in the photo)...note: it doesn't have to be the COMPLETE dotted area -- it can be a portion.  BUT -- and this is important (and I learned the hard way) -- you must crop this in the same aspect ratio as your camera takes photos or it will not calibrate correctly.

Once you've cropped the calibration sheet and saved it on your computer, click on the plus sign in the bottom right of the calibration area:


and navigate to and choose your calibration file when the window opens.

Once you open it, Silhouette will begin calibrating.  If there's problems with the calibration, it will tell you what may be wrong (and you may have to take a new photo of the calibration sheet on the PixScan mat).  If it's successful, you will see your profile pop up.  Modify if you want (I put my name at the beginning of the profile), and then save the profile.

Now you are ready to use the PixScan mat!  I tested it using a few stamped images.  First take a photo of your images on the PixScan mat.  For this, you have to make sure your image shows the full PixScan mat with the images.  It should be on a flat surface, and you should try to take the photo straight-on (or as close as possible).

Here's what mine looked like:


And it didn't matter that it was rotated sideways and had extra stuff beyond the PixScan mat!  So click on "Import PixScan Image from File":


Choose your image file and hit "Open".  Silhouette Studio will process the image, and then you will see a screen like this on the right:


And like this in the drawing area:


You are now ready to choose the images, trace the edges, and cut as you normally would! It's very important that you don't move the images on the PixScan mat after you have imported the photo because the cut won't be accurate if the placement has shifted on the mat.

I hope you found this tutorial useful...I've been having a lot of fun with it and am so happy for this new feature!

Have a great, crafty week,
Majken