Showing posts with label Silhouette. Show all posts

Saturday, May 14, 2016

{That Smile} Hand Stitched Letters

Hello, hello!  So glad you stopped by.  Today I have a new page that I did hand-stitching on for the first time.  While a bit time-consuming, it definitely adds a pretty and defined texture to papercrafts.  This layout is my darling daughter when she was one and a half. And who *doesn't* unload dishwashers with their sunglasses on, anyway??  :)


I had the concept of this layout started on International Scrapbook Day, but I sadly didn't get to finish then.  But I did take the time to visualize how I wanted the page to end up, and I knew I wanted to hand-stitch on it after seeing my friend Heather's page come together during a scrappy weekend.  Isn't that gorgeous?  I love her watercolor effect with it too.

Usually I don't have a specific title in mind when I start a layout, but in this case I did.  So I used the Just Nick Outline Alpha cut file to pull SMILE into Silhouette Studio and cut it out with stitch holes (see below for instructions).  I used an embroidery needle and floss to backstitch around each letter.  What a relaxing task to do during a bit of television!


Then I used a folder file cut file from the Silhouette Store to cut out my folder "mat" on that beautiful aqua heart paper.  Isn't the Bella Blvd She Blooms paper adorable?  


After I had the basic photo area done, I placed it temporarily where I wanted it to go, removed it, and splattered a bit of white mist on the top left and bottom right areas.  After it dried, I put the photo area back on and did some embellishing.  Here's the bottom right area with a small bit of journaling.


I normally will machine sew on my layouts but because I did hand-stitching on the title, I wanted to keep that the focus.  Instead I incorporated a few messy-thread areas with my stickers and enamel hearts - and a fussycut flower.


Here's a close-up of the stitching:


And all that created layers both underneath the stitching and on top using 3D foam tape!  

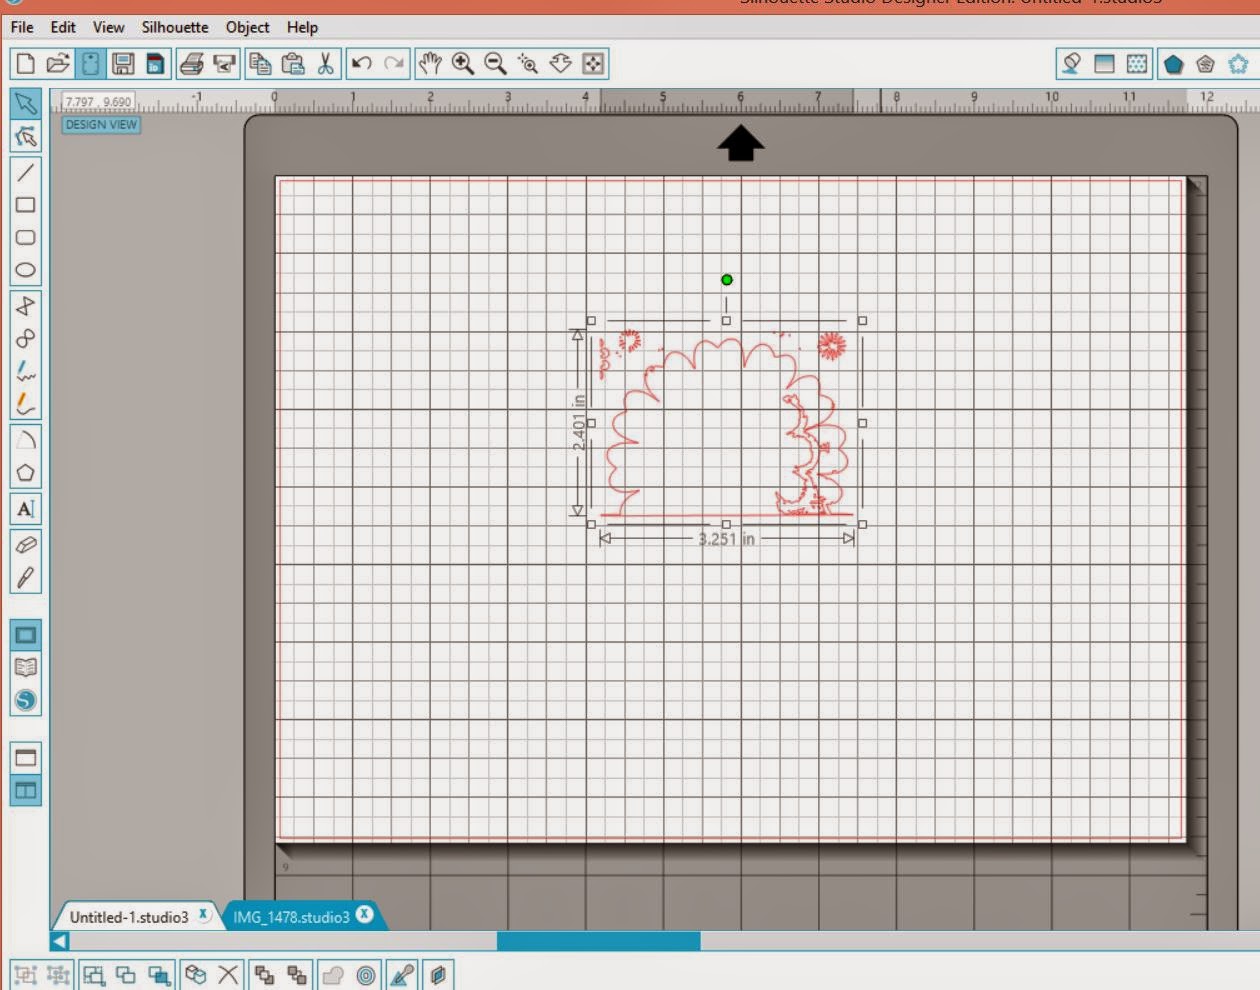
Here's a quick tutorial on how I created hand-stitching holes around my letters using Silhouette Studio and my Cameo.  I found this video helpful as a start.

  1. Trace your alpha cut file letters in the size you want the stitching to be.
  2. Align the letters to be evenly spaced horizontally and centered, keeping a little distance between them to account for the holes.
  3. Do an internal offset of the letters, and move the internal offset cut lines out of the cutting area for now.
  4. Create a text box with Times New Roman periods sized at 36.  Grab the crosshair circle and drag it to your first letter and the periods will "snap" around your letter.  Fill in the remaining periods until you have covered the letter.
  5. Repeat for each letter.
  6. Remove the cut lines for each letter, leaving the periods.
  7. Move the internal offset cut lines back to the center of each letter and send to your Cameo to cut.


I hope this inspires some hand-stitching!  I'd love to see your creations if you decide to use this fun technique, so feel free to share them with me in the comments or on social media.  If you found this helpful, I'd love for you to Pin it!

Have a super weekend filled with a bit of chocolate and scrapping time!

Majken

Saturday, April 2, 2016

He Picked Flowers

Hello out there!  Did you miss my bloggy absence?  I took an unexpected month off - my day job took a bit more energy these last several weeks.  PHEW!  But I'm back!  Today I'm sharing a layout using Crate Paper Hello Love...what an awesome collection, amiright?  And although it has a lot of pink in it, I emphasized many of the other colors in the collection.  Take a look!


I based my layout on the Spring 2016 sketch from Scrapbook & Cards Today Magazine.

What's not to like about that striped paper?  I layered some heart paper, the marbled green paper strip, some vellum I scalloped, and sewing for the base of the photo area.  It was a fluke that "so much love" showed at the bottom of the photo so I opted to keep it slightly longer to keep it rather than trim it to match the other three sides.


I created the title cutting "He picked" with my Cameo combined with those lovely Fancy Pants Designs alphas.  I used my Cameo to cut some flowers from Just Nick's Girl Power and layered them over the O.  I placed an enamel dot in the center to finish.


I scalloped another green marble strip and stitched it on the top.  I added another flower cluster too.


For the corner embellishment area, I completed the visual triangle with a third flower cluster.


For the journaling spot, I opted to print it out.  I used the font KG Always a Good Time to match the top part of my title.  I added more scalloped paper, stitching, a cut tab from the striped paper, and another enamel dot.


Et voila!  

Supply list:  Cardstock:  American Crafts; Patterned Paper:  Crate Paper Hello Love; Alphas: Fancy Pants Designs; Electronic Cut File:  JustNick; Punches: We R Memory Keepers; Enamel Dots: Pebbles, My Mind's Eye; Inks: Close to My Heart, Stazon; Adhesive: Scotch by 3M; Other: Vellum, Sequin

Tuesday, April 14, 2015

Silhouette PixScan Tutorial - Fussycutting Images

Hi everyone!  

Today I wanted to share a tutorial on how to fussycut images using the Silhouette PixScan mat.  It's fairly easy, and if you have a lot to cut, it can be a huge timesaver!

Note:  If you haven't calibrated your PixScan mat for your camera, here's how.

My tutorial will show how I cut the doilies for my Disney World visit with my favorite Hundred Acre Woods friends.  So let's get started!

The first thing you want to do will be to place the paper you want to cut onto the PixScan mat.  This can be a patterned paper or a paper with stamped images you want to cut.  Next, take a photo of it on the mat using the camera you have calibrated.  Make sure the entire mat is in the photo - it's okay if there's other stuff in the frame as well (like my black posterboard I had underneath the mat in the photo below).  Save the photo in a directory on the same computer where you have Silhouette Studio software.


Next, open Silhouette Studio and choose the "Open PixScan Image".


On the right-hand side, the PixScan menu appears.  Choose Import from File, browse to where you saved your PixScan image, and choose it.


This imports your image and you will see something like this:


Your next step is to open the trace window.  


Then select the image you want to trace for cutting.


Next, select High Pass Filter range and the Threshold range to get as smooth and solid a piece as possible for your cutting edge.  For this doilie, here's the ranges I had.  


Choose "trace outer edge, and then copy the traced area to a new sheet.  It may be imperfect, like mine.  If so, you will want to zoom in, erase what you don't want cut, and edit the points to clean the trace area.

My imperfect trace:


Here I use the erase tool to get rid of the parts I do not want to cut:


The clean trace image now looks like this:


Once that is complete, select all of the cutting image and choose "Make Compound Path".  Copy the full image and go back to the PixScan image screen to paste the cut image back over the part you are going to cut.


Next, if you want a border around your image rather than cutting up against the edge of your image, use the Offset tool.  I created an outside offset of .035".  In this case, I then cut the bottom part off using the knife and deleted it since it's the edge of the paper and doesn't need to be cut.


After you have finished putting the traced image around the image to cut, repeat this for any other images on the same paper that you want to cut at the same time.

Finally, insert the PixScan mat with the paper you took the photo of in step 1 - make sure you don't move this paper after taking the photo!  Choose the "Send to Silhouette" button and adjust your cut settings as needed.  The machine will take in the PixScan mat, look for the registration marks and begin cutting your images.

That's it!

This will save you a lot of time and paper, especially the more you cut at one time.

I hope you enjoyed this tutorial!

Majken

Sunday, August 10, 2014

Silhouette PixScan Calibration Tutorial for Cameo

Hello everyone!  Today I want to share with you some things I learned as I set up my Cameo to use the new PixScan cutting mat this weekend.  I think these tips will help you if you plan on using this new cutting mat and a camera (instead of a scanner).  Visit the following tutorials on using your PixScan once you've set yours up:


So, here's what you need:
The first thing you need to do after getting the new version of Studio is to click on the PixScan icon:


The PixScan area will show up with the PixScan menu area on the right-hand side.  Click on the arrow to the left of "Import from File".  Ignore my stamped images for now :)...


You will see the Camera Calibration area:


Click on the arrow to the left of "Camera Calibration" and click on "Show Calibration Test Card".


This will populate a dotted sheet in the drawing area:


You need to print this sheet out.  Now, when I printed it, there were a couple of rows that had dots not evenly spaced and it looked like my printer had messed up.  But I printed it out on another printer and it was the same, so I decided to try it.

Your next step is to place the printed calibration sheet onto the PixScan mat and then take a picture using the camera you wish to calibrate.  Make sure you are on a flat surface and you take the photo as straight-on as possible.

Important!  For this step, you next need to go into your photo and crop it so that the photo is ONLY the dotted area (no mat or anything else included in the photo)...note: it doesn't have to be the COMPLETE dotted area -- it can be a portion.  BUT -- and this is important (and I learned the hard way) -- you must crop this in the same aspect ratio as your camera takes photos or it will not calibrate correctly.

Once you've cropped the calibration sheet and saved it on your computer, click on the plus sign in the bottom right of the calibration area:


and navigate to and choose your calibration file when the window opens.

Once you open it, Silhouette will begin calibrating.  If there's problems with the calibration, it will tell you what may be wrong (and you may have to take a new photo of the calibration sheet on the PixScan mat).  If it's successful, you will see your profile pop up.  Modify if you want (I put my name at the beginning of the profile), and then save the profile.

Now you are ready to use the PixScan mat!  I tested it using a few stamped images.  First take a photo of your images on the PixScan mat.  For this, you have to make sure your image shows the full PixScan mat with the images.  It should be on a flat surface, and you should try to take the photo straight-on (or as close as possible).

Here's what mine looked like:


And it didn't matter that it was rotated sideways and had extra stuff beyond the PixScan mat!  So click on "Import PixScan Image from File":


Choose your image file and hit "Open".  Silhouette Studio will process the image, and then you will see a screen like this on the right:


And like this in the drawing area:


You are now ready to choose the images, trace the edges, and cut as you normally would! It's very important that you don't move the images on the PixScan mat after you have imported the photo because the cut won't be accurate if the placement has shifted on the mat.

I hope you found this tutorial useful...I've been having a lot of fun with it and am so happy for this new feature!

Have a great, crafty week,
Majken