Hello, hello! So glad you stopped by. Today I have a new page that I did hand-stitching on for the first time. While a bit time-consuming, it definitely adds a pretty and defined texture to papercrafts. This layout is my darling daughter when she was one and a half. And who *doesn't* unload dishwashers with their sunglasses on, anyway?? :)
I had the concept of this layout started on International Scrapbook Day, but I sadly didn't get to finish then. But I did take the time to visualize how I wanted the page to end up, and I knew I wanted to hand-stitch on it after seeing my friend Heather's page come together during a scrappy weekend. Isn't that gorgeous? I love her watercolor effect with it too.
Usually I don't have a specific title in mind when I start a layout, but in this case I did. So I used the Just Nick Outline Alpha cut file to pull SMILE into Silhouette Studio and cut it out with stitch holes (see below for instructions). I used an embroidery needle and floss to backstitch around each letter. What a relaxing task to do during a bit of television!
Then I used a folder file cut file from the Silhouette Store to cut out my folder "mat" on that beautiful aqua heart paper. Isn't the Bella Blvd She Blooms paper adorable?
After I had the basic photo area done, I placed it temporarily where I wanted it to go, removed it, and splattered a bit of white mist on the top left and bottom right areas. After it dried, I put the photo area back on and did some embellishing. Here's the bottom right area with a small bit of journaling.
I normally will machine sew on my layouts but because I did hand-stitching on the title, I wanted to keep that the focus. Instead I incorporated a few messy-thread areas with my stickers and enamel hearts - and a fussycut flower.
Here's a close-up of the stitching:
And all that created layers both underneath the stitching and on top using 3D foam tape!
Here's a quick tutorial on how I created hand-stitching holes around my letters using Silhouette Studio and my Cameo. I found this video helpful as a start.
- Trace your alpha cut file letters in the size you want the stitching to be.
- Align the letters to be evenly spaced horizontally and centered, keeping a little distance between them to account for the holes.
- Do an internal offset of the letters, and move the internal offset cut lines out of the cutting area for now.
- Create a text box with Times New Roman periods sized at 36. Grab the crosshair circle and drag it to your first letter and the periods will "snap" around your letter. Fill in the remaining periods until you have covered the letter.
- Repeat for each letter.
- Remove the cut lines for each letter, leaving the periods.
- Move the internal offset cut lines back to the center of each letter and send to your Cameo to cut.
I hope this inspires some hand-stitching! I'd love to see your creations if you decide to use this fun technique, so feel free to share them with me in the comments or on social media. If you found this helpful, I'd love for you to Pin it!
Have a super weekend filled with a bit of chocolate and scrapping time!
Majken
Hello and welcome to 2016! My holiday break has just flown by...I'd love to have just one more week before returning to work! I go back Monday...sigh! Well, before turning the page on 2015, I was inspired by the positive cuts that I had from the border from this layout. Those cute, little trees should be used, I thought! So when I was flipping through my new Scrapbook & Cards Today 2016 planner and came across the December 2016 sketch, I hatched a plan to cut a few more trees using the Just Nick Studios Tree Trio cut file and other Simple Stories Cozy Christmas papers to put them into that grid pattern. Here's what I came up with.

I wanted to use the brown snowflake paper, but adding trees to it would've made the layout overly busy! So I matted a sheet of white textured cardstock with it instead, and offset it so that a wider edge would show on the left and top. Then I sewed along the edges just inside the snowflake paper and again just inside the white cardstock. I used a cream colored thread to help it stand out just a bit against the white.
I am a sucker for stitching, especially with cut files! So I laid the trees out until the patterns were to my liking and sewed along the branches of the wider trees. I knew I wanted the Heidi Swapp "happy" wooden embellishment on my layout so I kept it out until I knew where to adhere it.
The title was fun to create. I purchased this Simple Stories phrase from the Silhouette store and cut just the "Christmas" out using a piece of the brown snowflake paper, plus two more times using plain cream cardstock so I could adhere them all together to get some depth to the word. I used alpha stickers and trimmed one of the Simple Stories stickers to get the "Our Merry Little" part of the title.
For the photos, I matted with another of the Cozy Christmas papers and put a few phrase stickers on them. And below the tree photo, I used more alpha stickers to capture the year.
Then it was just a matter of filling in with some simple embellishments like gold sequin stars, gems, and buttons. Plus adhering "happy" over one of the trees...that wooden phrase just makes me smile! I felt the top left corner needed just a tiny bit of something, so I adhered the mistletoe sticker with 3D foam tape and adhered three red gems over each berry. Super cute!
I opted to write my journaling on the back because I wanted to write quite a bit about our Christmas this year, and I didn't want to cram it on that bottom tree or in the bottom right corner.
So now I've used up most of my positive cuts from my previous layout, and it makes me happy to minimize my scrappy waste! What ways have you used your positive cuts?
Have a wonderful rest of your holiday, and I hope you've enjoyed a cup or two of hot chocolate. :)
Winter hugs,
Majken
Happy Mother's Day to all the mothers of human kids and/or fur-babies all the world over...and here's to a fresh new week in Spring 2014!
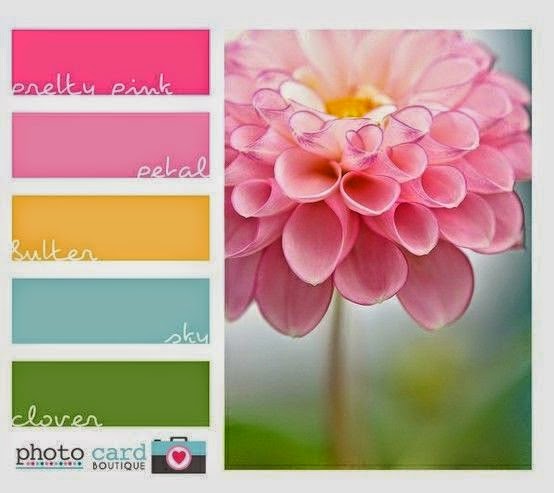
Today I'm sharing a layout highlighting the girl who made me a mom for the first time over 12 years ago. She's 6 weeks old in this layout, and I created this layout as inspiration from this Color Me Scrappy color scheme:
When I saw this color scheme, the Simple Stories "Fresh Air" Simple Set collection immediately popped into my mind. Here's my layout:

When I was thinking of spring, I was thinking of sunshine and flowers. I like the popular "rays" look but instead of straight rays, I wanted swirled rays to also connote flowers. I went to the Silhouette store and chose this peppermint file. I expanded it to fit within a 12 x 12 frame, and adjusted it to fit where I wanted the center of my swirls to be (slightly lower to the right than center). I cut each swirl out in my chosen paper, and I inked the edges using various inks: CTMH Crystal Blue, Smoothie, and Seafoam. After spattering a piece of white cardstock using Crystal Blue reinker, I adhered my swirl rays to the page and then sewed in light blue along the sides of each swirl (my photo will cover the points that don't exactly match up so I wasn't concerned about them not touching - you can adjust using your Silhouette software if you want them to touch):

Next, I layered my 5x7 photo with my favorites from the Fresh Air collection - I inked or distressed the edges as I layered. I added a few of the elements from the elements #2 and sticker sheets. I love the heart next to the cloud, but I added a sticker with four hearts on it, flower sequin and green brad to create an embellishment cluster.
Next, I created my title "You are my spring". I used the green alpha stickers from the collection for the "You". The sticker sheet had the phrase "you are my sunshine", so I trimmed the "are my" from that and matted it. To create "spring", I used CTMH D1481 "Vintage Type". I stamped the flowers in Smoothie and the letters in Crystal Blue and then fussy cut them out and adhered with 3D foam tape.
Next, I created an embellishment cluster on the top left of my photo area using lace tape, a fussycut flower with a yellow enamel dot, and a bow.
Finally, I created a journal spot using the Elements #2 paper and a couple of the stickers.
The challenge also included instructions to use things that started with the letters that spell "NEW". Mine are:
N = "N" stamp in title
E = Elements #2 paper in Fresh Air
W = Whimsical flowers
I hope you are inspired and enjoy your week! I am still working on some chocolate cake I got as part of an early Mother's Day dessert from a fabulous place here in Houston called The Chocolate Bar (thank goodness it's not near my house, or I'd be in.......
T-R-O-U-B-L-E!!)...and I hope you got some chocolate too. :)
Chocolate, scrappy hugs,
Majken