Showing posts with label Scrapping our Stash. Show all posts

Thursday, December 29, 2016

{Christmas Box} Scrapping Our Stash Blog Hop

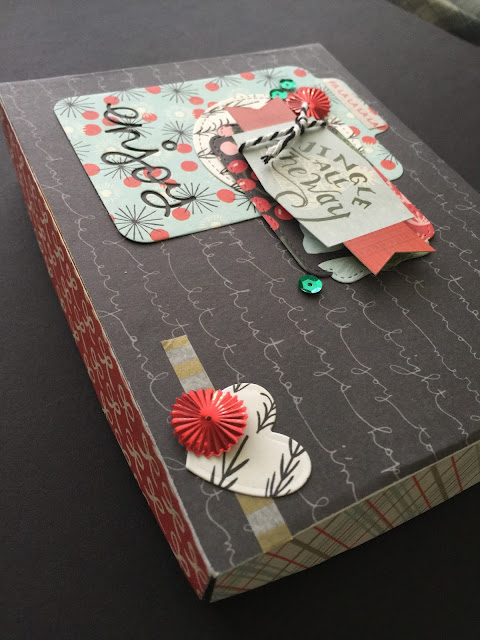
Hello everyone!  You might have arrived from Sandy's blog.  I hope your holiday has been wonderful so far.  If you give gift cards, it can be hard to figure out how to package them.  I often worry an envelope will get lost.  Plus they just aren't as fun to open, are they?  But then you have to wrap.  Well, I have a solution for the best of both worlds.  I kept a chocolate box from a few years ago because I knew I could find something fun to do with it.

And I dug into my Christmas collection stash of BasicGrey's Juniper Berry.  It's so beautiful (gosh I miss their papers!).  I came up with the following:


I just love the colors in the collection.  Simply gorgeous!  Here's a better view of the top of the lid:


And here's a view of the box from the side:


The original box:


Thanks so much for hopping along!  Next up, hop over to Lyne's blog to view her lovely Tiny Toes layout!  See you soon.

Majken

Materials:

  • BasicGrey Juniper Berry papers, stickers, and sequins/embellishments mix
  • Heart and stitched cirlcle die cuts - Lawn Fawn "Stitched Party Banners"
  • Folder die cut - Sizzix "Hello Life" by Lori Whitlock
  • Enjoy and stitched circle die cuts - Lawn Fawn "Small Stitched Envelope"


Full hop list:
Wendy Bergeron Coffman - http://www.stampingrules.com/2016/12/scrapping-our-stash-december-blog-hop.html
Sandy Ross - http://itsafamilyaffairwithscrappynana.blogspot.ca/2016/12/dear-santa-visiting-santa-scrapping-our.html
Majken Pullin - http://chocoscrapaholic.blogspot.com
Lyne Schnable-Blodgett - http://lynnseverydayideas.blogspot.com/2016/12/tiny-toes.html

Thursday, September 1, 2016

Absolutely Amazing - Scrapping Our Stash Blog Hop

Hi and happy Friday!  Today is a blog hop where we highlight projects using our older stash.  You might be here from Wendy's blog - if so, welcome!  If not, you can see the full list below to make sure you see all the designers' projects.

I'm digging back into my BasicGrey Vivienne stash again (that's how much I have of it, y'all!!), because I had so much fun creating a layout a couple of months back using the same collection!  I had some of the pieces from the Delicate Floral cut file left and decided to use them with another photo from the same series I had printed of my daughter at five years old.


The brown cardstock was left over from the flowers I cut for the last layout then backed it with white cardstock.  I decided to cut the insides of the flowers slightly offset on the inside to leave a white edge.  Then I started filling in the pieces.  I watercolored the stems and leaves lightly with green ink.  

This time instead of green grass, I used gold thread for my zig zag grass blades.


I did fill in some areas with enamel dots, like the center of the flowers.

The left bottom was made for an embellishment area.


I used one of the frames, some stickers and enamel dots and sequins, and sewing.

I used acetate shapes, paper, frames, stitching, staples, sequins, and ephemera to help frame my daughter's pretty face.  The 6x6 papers are perfect for matting.


I still felt like something was missing, so I found a bumble bee cut file, backed the wings with vellum, and dotted it with gold ink and backed with pop dots to help it stand out from the background.  Some more gold stitching to show its flight path helped tie it together!


That's my layout!  I hope you get some inspiration to use some cut files and machine stitching in your next layout!

Now head over to Alison's blog to see what she created!

Have a wonderful weekend, and don't forget to include some chocolate.


The full blog hop list:


Thursday, July 28, 2016

{Love Her} Scrapping Our Stash July Blog Hop

Hello everyone!  It's the end of July (already?!) which means it's time to scrap some of our stash and showcase in a blog hop.  You may have arrived from Audrey's blog - she always has lovely projects, doesn't she?  If you don't follow her blog, you should. :)  

This month I dipped back into my BasicGrey stash.  I just ADORE the Vivienne collection - those colors rock!  Here is my layout:


I can't really describe to you how much fun I had with this layout (a TON!!) - but I loved seeing these photos of my daughter from around nine years ago.  #ReminiscingIsFun.  Plus, isn't the Delicate Florals cut file from Just Nick awesome??  I cut the file out of CTMH Chocolate cardstock and backed it with the BasicGrey patterned paper that I also cut out with my Cameo using different patterns for different pieces.

Here's a close up so you can see the "grass" I sewed as well as my journaling and a few sticker, enamel, and gem embellishments.  I made a garden!  And this one will stay colorful and green (I do NOT have a green thumb in real life, y'all).


I dripped a few spatters of inks on the layout as well.


I created my photo by grabbing the four I wanted, organizing them in PicStitch (I put 3 in a vertical column and one square one on the right which I trimmed off to save for another time).  


For the title, I used an alpha cut file from Scrapbook & Cards Today for the "Love" (cut in two different colors to create a shadow, and then sewed through the middle.  Then I created "her" using my own handwriting!  I'll share a tip on how to do that below the pic.


Scrappy tip:  To cut a word using your own handwriting
  1. Write your word using a Sharpie or other marker in the width of your choice.
  2. Take a photo of your word and copy it to your computer
  3. In Silhouette Studio, open the .jpeg of your word
  4. Use the "trace" feature to trace the cutting edge around your word.
  5. Cut!
Here is what my pic looked like - I liked the one on the bottom best:


That's it!  Simple right?  I loved this because I wanted the word "her" in a scripty font so it would contrast the chunky alpha above it, but I couldn't find one that suited my needs.

I hope you have enjoyed the hop so far!  Your next stop is Alison.  

Have a great weekend!  Love and chocolate,
Majken


Materials used:

12x12 and 6x6 Paper, Ephemera, Stickers - BasicGrey Vivienne collection
Cut files - SCT, Just Nick, my own word
Mists - Heidi Swapp (Patina, Salmon, Bronzer)
Enamel Dots - BasicGrey
Sequins - Pretty Pink Posh (Tangerine)
Droplets - Queen & Co (Orange)


Thursday, April 28, 2016

{Little Cuties} Scrapping Our Stash Blog Hop!

Hello and happy Friday y'all!  Welcome, welcome.  You may have arrived today from Katrina's blog.  Her projects are amazing!  Glad you could stop by.  Today I'm sharing a layout using the Creative Scrappers April Sketch (which is FABULOUS!) and American Crafts Better Together collection.  And I have a giveaway!  Take a peek at my layout.  My nephew and niece are super cute!!


I started with some CTMH Outdoor Denim cardstock for the backdrop for these fun papers!  I created a quick template to cut the triangles using my Cameo because I'm not good with the diagonals using my Fiskers trimmer - ha!  I cut triangles from 3 papers and offset the stars and the hearts to be opposite each other.  I purposely left the right side blank to help show the title better.  And then I sewed along the inside edge of each triangle.

After matting and sewing the photos of those cuties, I popped it up with 3D foam.  Super fun!  And then I had a star party!  I cut several using my Cameo but I also put some star stickers, sequins, and enamel stars.


 And then I put even more on!


Next I created the title using my Cameo to cut the "little" and some Thickers for "cuties".


I printed out some journaling strips and popped those up with 3D foam tape too.


I adore that star paper...must. buy. more!  ;)  Here's a quick look at the other embellishment areas.


And there you have it!  I had so much fun with this sketch, I hope you are inspired to create with it.


And now for the good part!  It's GIVEAWAY time!  

Today I'm giving away a $15 gift certificate for Paper Issues so you can add to your crafty stash!  All you have to do is follow my blog using Google and/or Bloglovin over on the right of my blog plus follow me on Instagram.  If you are inclined to leave a comment, I'd love that too.  Super simple and easy peasy!  You have until Monday, May 2, 2016 to enter for your chance to win.  I will announce the winner on Tuesday, May 3rd.  

Now it's time to continue your hop along to the supremely talented Christine!  Her projects usually knock my socks off!  And if you want to start from the beginning, the list is below.  Thanks so much for stopping by! 

xoxo,
Majken

Juliana http://www.17turtles.com/

Thursday, February 25, 2016

Bust a Move -- Scrapping Our Stash Blog Hop

Hi everyone!  Welcome, welcome.  Grab some chocolate, and make sure you keep hopping after you check out my scrappy project!  You should've arrived from Juliana's blog, but if you came here first, the full hop list is at the bottom.

So I opted to grab some Simple Stories "Rad" stash for today's project. It's such a wonderful collection (here's another layout I used Rad for)!  Here's the full layout:


And here are some close ups!


I did some sewing, used the coordinating washi tape for my journaling, and used punched circles and the "New Bradz" for extra embellishment.


I used JustNick Studios' Handcut Letters to cut out "Bust" and popped up with foam tape.  So fun!


I followed along with the February Paper Issues Sketchy Saturday for inspiration.


Now it's time to hop along to Monica's blog and project.  Thanks so much for stopping by today!


Thursday, January 28, 2016

Scrapping Our Stash Blog Hop - My Whole World using BasicGrey

It's the last weekend of January, and so you know what that means? We're having a blog hop to help use some our large stashes! And boy, do I stash.  And then I stash more. And then I do a little hoarding. And then new collections come out, and I buy more. <ahem>

Anywaaaay...you should've arrived from Juliana's blog with her gorgeous layout about her puppy. Such fun projects so far, so take a peek at my layout, scroll down to enter in a giveaway, and then keep hopping for more fun projects. Here we go!

So I got out my BasicGrey Typeset collection and used a dash of some BasicGrey Sunkissed embellishments to go along with it. (I'm soooo bummed they are leaving the industry.) :(


I wanted a way to use several patterns from the Typeset 6x6 paper pad without overwhelming the photo. So, I started by pairing 5 papers from the paper pad and cutting 0.75" wide strips into 1.5" lengths for a bunch of "bricks" to layer as the bottom border.


I layered them in three rows, stuck them down with a dab of adhesive, and then sewed along each row. I stuck a few sequins and gems along the stitching and then popped up the "Capture This Moment" sticker with 3D foam tape.

I put another row of the "bricks" at the top and sewed again, this time adding the embellishment cluster.


Then I focused on my photo area by layering a few sheets of the 6x6 pad leftover from the strips. I created a few tabs and a photo corner too.


Finally the title using the alpha stickers from Sunkissed and the word "whole" cut with my Cameo, with some added stitching.


I hope this inspires you to CUT UP some of your 6x6 paper pads and have fun with them! 

Are you ready for the giveaway? I'm giving away a $15 gift card to Paper Issues so you can add to your own stash! All you have to do is:

  • Follow me on instagram AND
  • Be or become a member of my blog with Google Friend Connect or Bloglovin AND
  • Leave a comment on this blog post
Easy peasy! You have until Monday, Feb. 1st at noon Central time to enter for your chance to win. International entries are fine, and I use random.com to choose the winner. I'll announce the winner here on my blog on Tuesday, Feb. 2nd. Good luck! Thanks so much for hopping along with us.

Now head over to Suzanna's blog to get more inspiration and see a unique snowflake cut file!  Thanks so much for stopping by!


Lee-Anne  http://lee-annelovethejourney.blogspot.com
Majken http://chocoscrapaholic.blogspot.com/  ***YOU ARE HERE***
Suzanna http://lifestrivialities.typepad.com   ***VISIT HERE NEXT***

Thursday, September 24, 2015

Confetti Cards - Scrapping our Stash Blog Hop with Giveaway

Hello crafty people out there!  Welcome back for this month's Scrapping Our Stash blog hop, where we pull out the crafty materials we've been hoarding and USE them to showcase the last weekend of the month.  You probably arrived from Alison's blog and those cute treat bags -- I'm so glad you hopped over!  Read on and then enter for your chance at my giveaway below.

This month, I worked on some cards instead of a layout because my card stash is getting low.  I chose the Crate Paper Confetti collection by Maggie Holmes released in January.


Great black and gold elements combined with the pretty colors!  The first thing I did was create a shaker card filled with...confetti of course!!


I started with black textured cardstock and a "happy birthday" 4x6 card from the "Party" paper.  I trimmed the "happy birthday" out from the pocket card and set it aside for another card.  I punched confetti and sprinkled some chunky gold glitter in between two pieces of acetate from some packaging and adhered them together.  I layered the windowed pocket card over the confetti and stitched around it twice with gold thread.  Finally I adhered the "Celebrate" Thicker over the shaker area and stuck a Maggie Holmes bow from my stash below the window.  Quick, easy, and best of all...fun!


Next up - the happy birthday card using the piece I cut from the pocket card above.


Black textured cardstock is the base again.  I trimmed the party hat "Surprise" paper just smaller than the base and stitched in gold around the edge.  I used a waterbrush pen to watercolor over the sentiment in a peachy-pink color to match the collection, adhered to a piece of black cardstock, and stitched around the edge.  Then I watercolored around the outside edge of the stitching in light green and adhered that to the card base using 3D foam tape.  I added the "yay" Thicker and a gold sequin to finish.


"Yay" for the next card!  


I trimmed another piece of the party hat paper and stitched around the edge onto black cardstock.  I watercolored light green onto the outside edge.  Next, I trimmed the black "yay!" pocket card from the "Party" paper and stitched around it.  I tied some twine around the top, adhered it to the card, and put the "Celebrate" Thicker on the bottom.


Last but not least, "happy day":  


I trimmed a piece of the words paper from "Backdrop", stitched to black cardstock, and then watercolored in light green around the edge and to highlight a couple of the phrases.  I cut a few of the banner pieces from the "Party" paper and stitched through the center one.  I finished the card with tiny alpha stickers from Tim Holtz and a few Confetti gold sequins.


Well, that's all for me today!  I'm happy to have a few more cards in my stash, and this was the perfect collection for them.  


****Giveaway Time!****

I'm giving away one $15 e-gift certificate to My Scraps & More.  All you have to do is:
  • Follow my blog with Google Friend Connect, Google+, or Bloglovin AND
  • Leave a comment on this blog post with your favorite type of card to make
Simple!  You have until Monday, Sept. 28th at noon Central time to enter for your chance to win.  International entries are fine.  I use random.com to choose the winner.  I'll announce the winner here on my blog on Tuesday, Sept. 29th.  Good luck, and now it's time to hop along to Katrina's blog to check out her pretty project!

xoxo,

Thursday, August 27, 2015

Note 2 Self | Scrapping Our Stash Blog Hop with Giveaway!

Hi everyone-

Today's page is part of the Scrapping Our Stash blog hop (and boy what a stash I've collected through the years!), and I'm so excited to share my layout with you for ALL THE REASONS but mainly:  
  1. I adore this J'Adore collection from BasicGrey
  2. It's based on a sketch by Audrey Yeager she did as guest designer for the Scrap Our Stash Challenge Blog (not related to our hop) and 
  3. It's a page about me.  Do you find it hard to do pages about yourself?  I do!!  (I have created this one and this one.)
You should have arrived from Christine's awesome boy-themed layout...but the full hop list is at the end if you get stuck or want to start at the beginning.  So grab some chocolate, hop along with us, and enter below for your chance to win some scrappy goodness from My Scraps & More!  But first:  


I started with a blank slate of white textured cardstock.  I chose two inks to create the splatters (CTMH Outdoor Denim and Tulip) on the top left and bottom right.

I trimmed the "Cuddle" paper first into two pieces - I adore those pretty flowers!  I layered a strip of the B-side of the "Sweetheart" paper and a strip of Studio Calico's Darling Dear Hepburn Chevron patterned vellum that I scalloped (love that stuff!).  


I next trimmed rectangles from "Kiss", "Cuddle", and "Sweetheart" to mat my photo.  To help my photo pop a little more, I needed a little layer of white, and to create a different texture to the photo area, I used one of my dies from Mama Elephant's Peek-a-Frame set.  And before I put my photo mat area on the layout over my strips, I machine stitched several circles to go along with the sketch.


After I put the photo area on, I dug through my embellishment stash and chose some sequins, wooden hearts, and enamel dots to sprinkle around the circles and among the ink splotches.  

And then, it hit me:  Must. Fussycut. Flowers!


I tucked a minty Maggie Holmes tag behind the photo area to complete the challenge Tic Tac Toe!  I also fussycut a wobbly circle to frame my journal area.  I used alpha stickers from the J'Adore collection for "Note", a minty "2" and then I used my Cameo to cut "self".


I hope you liked my layout!  And now, the fun part:  a giveaway!  I'm giving away one $15 e-gift certificate to My Scraps & More.  All you have to do is:
  • Be or become a member of my blog with Google Friend Connect or Bloglovin AND
  • Leave a comment on this blog post
Easy peasy!  You have until Monday, August 31st at noon Central time to enter for your chance to win.  International entries are fine, and I use random.com to choose the winner.  I'll announce the winner here on my blog on Tuesday, Sept. 1st.  Good luck! 

Next up on the hop is Katrina!  Head over to see her lovely puppy-themed layout!

Thanks sooo much for hopping along with us!  Below find the sketch, challenge Tic Tac Toe with my choices highlighted, and the full hop list.


Full hop list: