Thursday, April 23, 2015

Good Times - Scrapping Our Stash Blog Hop | Sketch 14 from MSAM Sketchathon

Top of the weekend to you!  Thanks for joining us along our scrappy hop this weekend, where we scrap our stash.  And quite a large one, I have.  I've yet to find a 12-step program for it, though!!  You should've arrived here from Kristy's blog.  The full list is at the bottom if you started in the middle or want to start over.

I created today's layout using BasicGrey's Vivienne collection.  I adore this collection...I think you can tell by my blog header as well as this layout.  :)  Well, I just love BasicGrey in general! 

I also used sketch #14 from the My Scraps & More April Sketchathon...there's about a week left to play along.  Come join in, why don't you?   

So here's today's layout:


I used textured white cardstock as my base and added a piece from Vivienne.  Then I splattered with pink spritz as well as Bronze Color Shine.  

Then I started cutting strips from the 6x6 paper pad as well as the 12x12 papers in different widths and lengths.  I then adhered them and sewed across a few of them.


I matted my photo and used 3D foam dots to pop it up.  I also cut a peace sign using my Cameo and used that as a 3D embellishment.  I created the title using a sticker from the collection and layers of the paper.  My journaling spot is near that as well.


I also added some stickers and acrylic pieces around the strips and title:


And here is the sketch by Missy Whidden:


That's it for me today!  Your next stop on the hop is the very talented Wendi!  Go leave her some blog love.  Have a super weekend everyone!

Majken


Christine http://scrappingwithchristine.blogspot.com
Juliana www.17turtles.com 

Cathy http://alteredplayground.blogspot.com/ Sandy http://itsafamilyaffairwithscrappynana.blogspot.ca/ Kristy http://alwaysworldaway.blogspot.com Majken  http://chocoscrapaholic.blogspot.com  ***YOU ARE HERE*** Wendi R http://scrappydayinparadise.blogspot.com/  ***GO HERE NEXT*** Wendy C www.stampingrules.com Lee-Anne http://lee-annelovethejourney.blogspot.com

Friday, April 17, 2015

Where Are You? - My Scraps & More Sketch #104

Friday is here!  And it's the 3rd Friday in April which means I get to share another layout for the My Scraps & More sketch blog.  Today's reveal is a sketch by the extremely talented Nicole Nowasad!  I love her work, and I really had fun with it.  See my layout below and then go check out all the other layouts from the sketch design team!


Cats are such fun creatures, and my two love to play their version of hide and seek...which means one pretends to hide and the other knows where, but wants to surprise the other one by jumping on them when they emerge from their hiding spot.  Silly kitties!

For my layout, I used Simple Stories Life Documented with a base of kraft cardstock.  I flipped the layout on its side for a bit of fun.  I cut strips of various widths and lengths and inked the edges with dark blue ink.  Instead of laying them all down parallel with each other, I decided to put them at slight angles.  Once I had them where I wanted them, I sewed along each one to create the sense of movement.  For the largest strip, I sewed three shorter lines on each side.  


I matted the photos using the blue polka dot paper, and then placed them over a wood grain strip.  I wanted the photos to have some dimension, so I popped them up with 3D foam tape.

Next I placed a corner embellishment area using the striped paper, one of the Bits & Pieces and an enamel dot.


I created the title with Freckled Fawn Wood Chip Alphas and Simple Stories Sn@p! alphas. I could *NOT* find a question mark that worked, so I created one using the same technique as I used on this fun "Who's Who?" layout


I created some journaling spots using more Life Documented Bits & Pieces and enamel dots.


That's it for today!  I hope you use this sketch and play along with My Scraps & More.  If you do, remember to post it for a chance at the April prize, a pack of Pinkfresh Studios Up in the Clouds collection.

Have a scrappy weekend,
Majken

Tuesday, April 14, 2015

Silhouette PixScan Tutorial - Fussycutting Images

Hi everyone!  

Today I wanted to share a tutorial on how to fussycut images using the Silhouette PixScan mat.  It's fairly easy, and if you have a lot to cut, it can be a huge timesaver!

Note:  If you haven't calibrated your PixScan mat for your camera, here's how.

My tutorial will show how I cut the doilies for my Disney World visit with my favorite Hundred Acre Woods friends.  So let's get started!

The first thing you want to do will be to place the paper you want to cut onto the PixScan mat.  This can be a patterned paper or a paper with stamped images you want to cut.  Next, take a photo of it on the mat using the camera you have calibrated.  Make sure the entire mat is in the photo - it's okay if there's other stuff in the frame as well (like my black posterboard I had underneath the mat in the photo below).  Save the photo in a directory on the same computer where you have Silhouette Studio software.


Next, open Silhouette Studio and choose the "Open PixScan Image".


On the right-hand side, the PixScan menu appears.  Choose Import from File, browse to where you saved your PixScan image, and choose it.


This imports your image and you will see something like this:


Your next step is to open the trace window.  


Then select the image you want to trace for cutting.


Next, select High Pass Filter range and the Threshold range to get as smooth and solid a piece as possible for your cutting edge.  For this doilie, here's the ranges I had.  


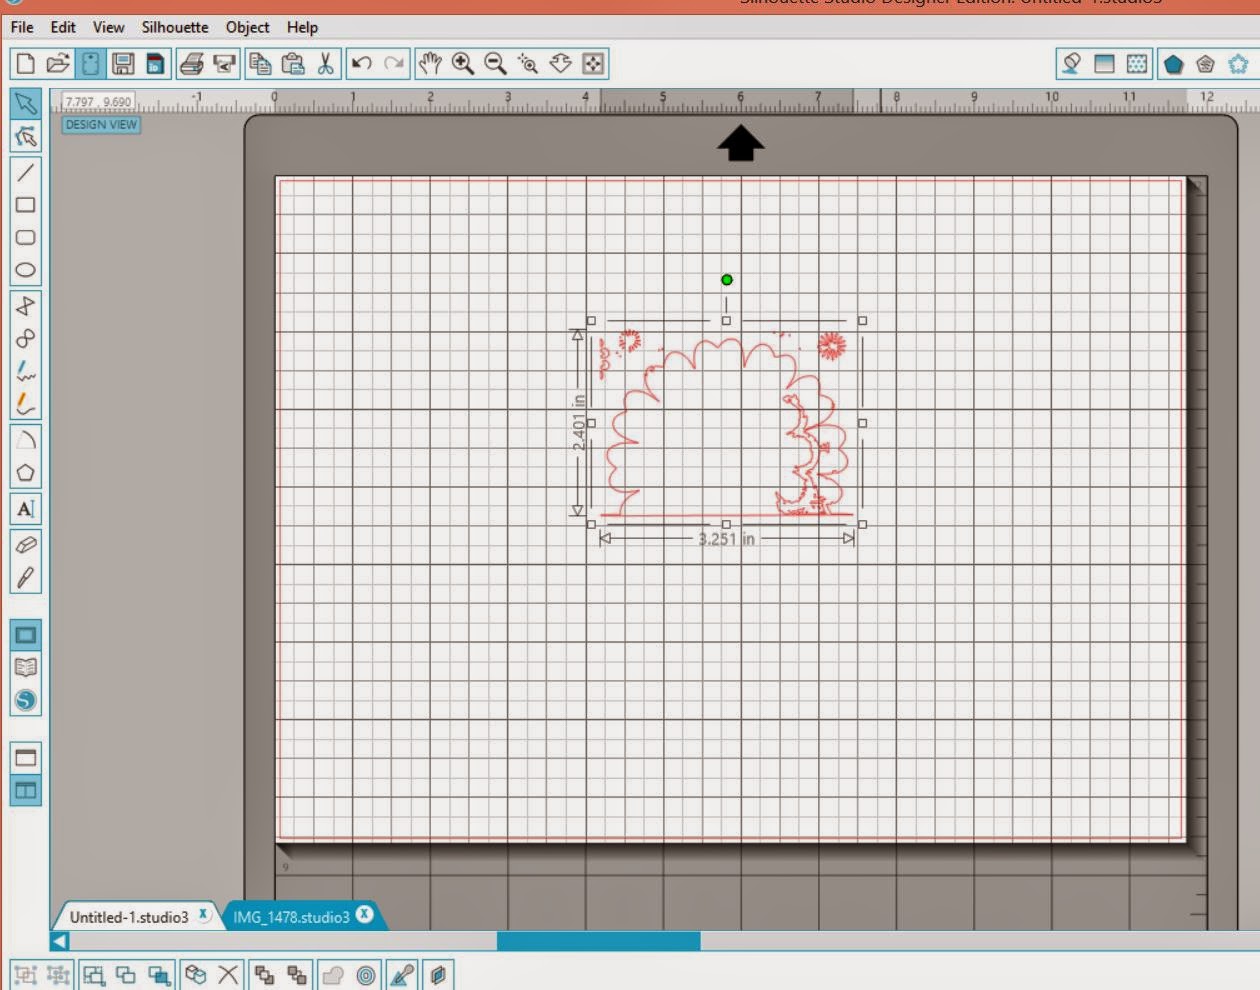
Choose "trace outer edge, and then copy the traced area to a new sheet.  It may be imperfect, like mine.  If so, you will want to zoom in, erase what you don't want cut, and edit the points to clean the trace area.

My imperfect trace:


Here I use the erase tool to get rid of the parts I do not want to cut:


The clean trace image now looks like this:


Once that is complete, select all of the cutting image and choose "Make Compound Path".  Copy the full image and go back to the PixScan image screen to paste the cut image back over the part you are going to cut.


Next, if you want a border around your image rather than cutting up against the edge of your image, use the Offset tool.  I created an outside offset of .035".  In this case, I then cut the bottom part off using the knife and deleted it since it's the edge of the paper and doesn't need to be cut.


After you have finished putting the traced image around the image to cut, repeat this for any other images on the same paper that you want to cut at the same time.

Finally, insert the PixScan mat with the paper you took the photo of in step 1 - make sure you don't move this paper after taking the photo!  Choose the "Send to Silhouette" button and adjust your cut settings as needed.  The machine will take in the PixScan mat, look for the registration marks and begin cutting your images.

That's it!

This will save you a lot of time and paper, especially the more you cut at one time.

I hope you enjoyed this tutorial!

Majken

Sunday, April 12, 2015

Smile * Click * Captured - Fancy Pants Sketch This! April

Hi everyone!  I hope you are having a great spring weekend.  It's been rainy here, which is perfect for doing some fun scrapping!  This weekend I completed a layout for the Fancy Pants Sketch This! for April.  This layout highlights our visit to Amarillo for my niece Courtney's wedding.  My daughter, niece Sophie, and mom are seriously be-you-tiful!


I love this polka dot paper from Memories Captured, so I used it as my base.  I stayed pretty true to the sketch, but I added a few extra things.  

For the title area, I used a strip of the Fancy Pants black corrugate cardstock and trimmed the strip from "Strips" with the *click* on it.  I incorporated that into my title.  I used the Black Large Alpha stickers to spell *SMILE*, and then a sticker with "captured" on it from the collection.  I created a corner embellishment area with some stitching, and I cut one of the circles and popped it up with 3D foam.


The photo area is matted with the Shining Stars and Memories papers (I stitched along the stars paper after distressing it), and includes a tag, some stickers, and a burlap bow from the Burlap & Bouquets collection.  I heart this bow! I die cut an arrow from the burlap paper to balance out the burlap from the bow and popped it up with 3D foam. 


That's it for me for today.  Stay tuned this week for another sketch reveal for My Scraps & More on Friday.  Until then, I hope you get a few final bits of Easter candy to enjoy!

Majken

Friday, April 3, 2015

Lucky 13 - My Scraps & More Sketch #103 Reveal

Hi sketchy, scrappy folks out there in papercrafting land!  Happy Friday!

I'm having a blast participating with the My Scraps & More sketch team, and today's reveal has a great sketch created by Audrey Yeager.  See my layout below, and then head over to the MSAM sketch blog to see how everyone else interpreted the sketch.  I used Pinkfresh Studio's Up In The Clouds collection.  

My daughter recently turned thirteen (eek!), and we celebrated with a dinner out at the restaurant of her choice.  


My layout base was a Bazzill textured cardstock I had in my stash and matched the Pinkfresh very nicely.  And I wanted the photo to rest on the neutral paper with the doodled hearts and stars, so I actually worked with that next.

After I had that part together, I inked the paper edges with a blue-green ink and layered the pink "Love" paper and the blue stitched papers behind it angled similarly to the sketch.  Once I had the layers the way I wanted them, I cut the title numbers from the center of the blue stitched paper since I knew that would be hidden by the layers on top.  This is a great way to save paper!


I finished the title with ink and stitching and then used Heidi Swapp alphas to spell "Lucky" over it.

For the top strip, I angled the doodle paper, inked the edge and stitched across it.  Then I included some of the Pinkfresh hearts, some gems, and a wooden star.  You can also see I outlined and filled in several of the hearts with a Gelly Roll glitter pen.  I stitched around several parts of my layered papers.


Next, I created an embellishment cluster using a Heidi Swapp "shine", another Pinkfresh heart, and a wooden arrow.


I completed the layout with journaling.  You can see more hearts and stars filled in with a Gelly Roll glitter pen.


I hope you join us with this sketch!  Post your interpretation of the sketch during April for a chance at a great prize from My Scraps & More.

Have a fabulous weekend!

Majken

Thursday, April 2, 2015

Scrapping Our Stash Giveaway Winner!

Well, I'm sorry to have failed to post the winner of the blog hop giveaway, but better late than never?

Thank you all for being such great followers -- I am so glad to read everyone's comments.

The winner of this month's hop giveaway is #3:


Scrolling down in the comments section, #3 is Janet!  Congrats Janet!


Janet, please email me at majkenmarie at yahoo dot com before end of day Tuesday, 4/7, and I'll get your $15 e-gift card to you via email.

If you didn't get a chance to view the blog hop, there's one on the last Friday/weekend of every month.  See you on April 24th!

Enjoy your Easter (with some chocolate!),
Majken