Hi everyone - hope you are having a craft-tastic weekend! I wanted to pop in quickly to share a card that uses the paper basketweave technique and also is a shaker card! I used the gorgeous Crate Paper Hello, Love collection (here's a layout I shared last week using the collection).
Take a look!
The card is simple, yet fun. The basketweave piece is approximately 4x6 and the finished card is 5x7.
To create the shaker, I took a photo of the heart from one of the patterned papers in Hello, Love, loaded it into Silhouette Studio and then cut it out. I put patterned paper as the base for the heart (trimmed to just smaller than the heart), and then sprinkled sequins and shapes. Using some leftover clear packaging, I trimmed that to the size of the heart as well and then put the cut heart on top.
Some twine, enamel dots, and a "love" rub-on complete the card.
Have you tried paper basketweaving yet? If not, I hope you do...it's addicting!
Chocolate hugs,
Majken
Saturday, April 9, 2016
Thursday, April 7, 2016
{Paradise Adventure} April Stuck?! Sketch & Simple Stories
Hello! Today I have a layout for you that uses some foiled shapes I created using both my Silhouette PixScan mat and my Heidi Swapp Minc (I have a tutorial here showing you how to do this at home). Grab some chocolate and come along!
I used Simple Stories You Are Here collection to highlight some photos from my honeymoon back in 2000 (no, I am still working on scrapping the trip 16 years later! And the time warp continues!).
Here are some close ups. I love sewing on my layouts. Aren't the photo stickers and New Bradz awesome?
Here you can see the gold foil anchor I created using my PixScan mat and Minc, along with another New Bradz, enamel dots, and photo sticker.
How cool is this fussycut flower cluster popped up with 3D foam tape?
And here's a close up of the title and journaling. I used CTMH stamp set "Hello Paradise" and then print/cut/foiled the "adventure" and the heart I stuck on top of the chipboard camera.
I used the April sketch from Stuck?! Sketches.
Thanks for joining me today! I hope you have a wonderful weekend.
Majken
I used Simple Stories You Are Here collection to highlight some photos from my honeymoon back in 2000 (no, I am still working on scrapping the trip 16 years later! And the time warp continues!).
Here are some close ups. I love sewing on my layouts. Aren't the photo stickers and New Bradz awesome?
Here you can see the gold foil anchor I created using my PixScan mat and Minc, along with another New Bradz, enamel dots, and photo sticker.
How cool is this fussycut flower cluster popped up with 3D foam tape?
And here's a close up of the title and journaling. I used CTMH stamp set "Hello Paradise" and then print/cut/foiled the "adventure" and the heart I stuck on top of the chipboard camera.
I used the April sketch from Stuck?! Sketches.
Thanks for joining me today! I hope you have a wonderful weekend.
Majken
Tuesday, April 5, 2016
Using the Silhouette PixScan Mat to Create Minc Foiled Words and Shapes
Howdy crafters! I have a fun tutorial to share with you today using the Silhouette PixScan mat (here's a tutorial on how to calibrate PixScan for your camera if you are just getting started). I got a Minc Mini for Christmas (thanks Santa!), and because my HP OfficeJet printer recently passed into printer heaven after years of good service, I spent a little extra money and got a LaserJet printer recently. I work from home so the extra quality is nice, PLUS because it uses toner, I can now use it for foiling - win-win! The possibilities are endless!
What you'll need:
First I typed some words in different fonts and included some icons from an shape font to print out onto a sheet of 8 1/2" x 11" cardstock. I wanted "adventure" to complete my layout title but I didn't want to waste cardstock and I know I'll use the other icons somewhere so I added several to print!
Here is the photo after importing (it turns the mat arrow the correct way on its own):
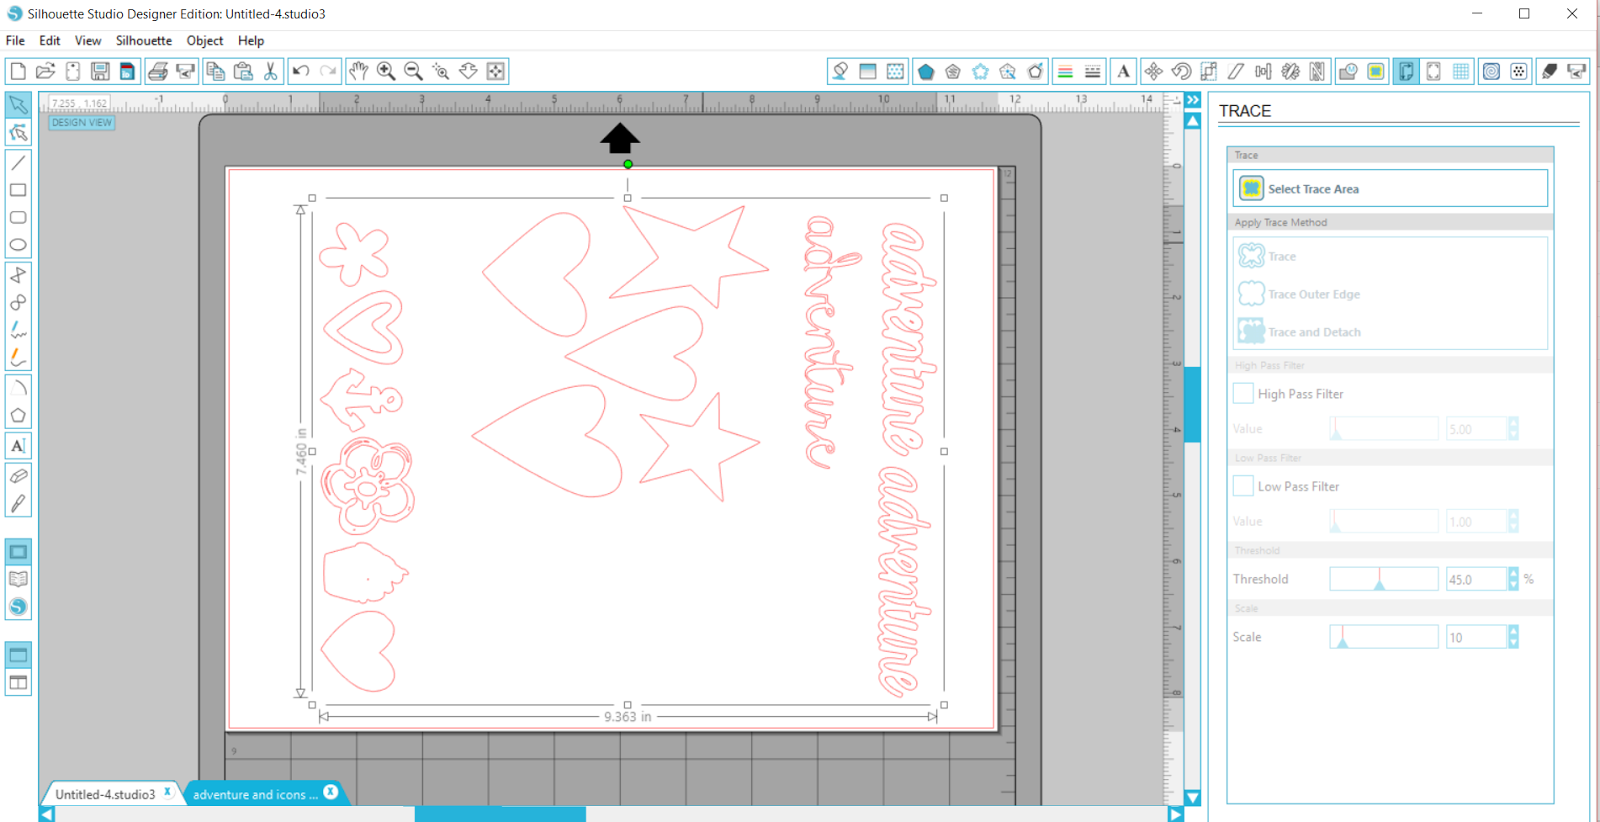
The next step is to trace the images. In this case, I turned High Pass Filter off and traced.
Next, I copied the red traced elements onto a new drawing area so I could zoom in and fix any trace errors by editing points, etc.
Once all of them were fixed, I created a slight internal offset for the full sheet, cleaned it up, and copied the traces back onto the PixScan mat drawing area.
Tip: The internal offset helps account for slight variations based on the photo of the images on the PixScan mat. If you'd rather have a border cut around your images, then you can create an external offset.
The next step is sending this to the Silhouette Cameo to cut. Once they are cut, they are ready for the Minc!
Then run it through the Minc (I used setting 3).
The outcome? Foiled goodness!! And this fun layout.
I'd love to see what you create with your PixScan and Minc!
Thanks for sharing, pinning, and your feedback! Happy scrapping and crafting!
Majken
What you'll need:
- Laser printer (available at printing shops like Kinko's etc. if you don't have one; or purchase Minc toner sheets)
- Cardstock
- Silhouette digital cutting machine (I use a Cameo)
- Silhouette PixScan mat
- Silhouette Studio software
- Heidi Swapp Minc and transfer folder
- Foil
First I typed some words in different fonts and included some icons from an shape font to print out onto a sheet of 8 1/2" x 11" cardstock. I wanted "adventure" to complete my layout title but I didn't want to waste cardstock and I know I'll use the other icons somewhere so I added several to print!
The next step is putting the sheet on the PixScan mat and importing it into the Silhouette Studio software. Remember to take the photo as straight on as possible and in good lighting.
Tip: Mine gave me the error "cannot detect the PixScan markings" several times. After several takes, I rotated my mat 180 degrees so the arrow was pointing down like you see below, and it worked (I suspect a lighting issue). Below is the photo I used to import to Studio.
Note: it ignores everything outside the mat, so it's okay if other stuff is in the photo.
Note 2: Once you have a photo imported, it's very important to NOT remove the cardstock from the PixScan mat because it sees the images based on their position to the mat's registration marks.
Here is the photo after importing (it turns the mat arrow the correct way on its own):
The next step is to trace the images. In this case, I turned High Pass Filter off and traced.
Next, I copied the red traced elements onto a new drawing area so I could zoom in and fix any trace errors by editing points, etc.
Once all of them were fixed, I created a slight internal offset for the full sheet, cleaned it up, and copied the traces back onto the PixScan mat drawing area.
Tip: The internal offset helps account for slight variations based on the photo of the images on the PixScan mat. If you'd rather have a border cut around your images, then you can create an external offset.
The next step is sending this to the Silhouette Cameo to cut. Once they are cut, they are ready for the Minc!
I took two "adventure" words, a heart, and the anchor to the transfer folder for my Minc. I turned my folder over to make sure all my pieces were covered with the gold foil.
Then run it through the Minc (I used setting 3).
The outcome? Foiled goodness!! And this fun layout.
I'd love to see what you create with your PixScan and Minc!
Thanks for sharing, pinning, and your feedback! Happy scrapping and crafting!
Majken
Saturday, April 2, 2016
He Picked Flowers
Hello out there! Did you miss my bloggy absence? I took an unexpected month off - my day job took a bit more energy these last several weeks. PHEW! But I'm back! Today I'm sharing a layout using Crate Paper Hello Love...what an awesome collection, amiright? And although it has a lot of pink in it, I emphasized many of the other colors in the collection. Take a look!
I based my layout on the Spring 2016 sketch from Scrapbook & Cards Today Magazine.
What's not to like about that striped paper? I layered some heart paper, the marbled green paper strip, some vellum I scalloped, and sewing for the base of the photo area. It was a fluke that "so much love" showed at the bottom of the photo so I opted to keep it slightly longer to keep it rather than trim it to match the other three sides.
I created the title cutting "He picked" with my Cameo combined with those lovely Fancy Pants Designs alphas. I used my Cameo to cut some flowers from Just Nick's Girl Power and layered them over the O. I placed an enamel dot in the center to finish.
I scalloped another green marble strip and stitched it on the top. I added another flower cluster too.
For the corner embellishment area, I completed the visual triangle with a third flower cluster.
For the journaling spot, I opted to print it out. I used the font KG Always a Good Time to match the top part of my title. I added more scalloped paper, stitching, a cut tab from the striped paper, and another enamel dot.
Et voila!
Supply list: Cardstock: American Crafts; Patterned Paper: Crate Paper Hello Love; Alphas: Fancy Pants Designs; Electronic Cut File: JustNick; Punches: We R Memory Keepers; Enamel Dots: Pebbles, My Mind's Eye; Inks: Close to My Heart, Stazon; Adhesive: Scotch by 3M; Other: Vellum, Sequin
What's not to like about that striped paper? I layered some heart paper, the marbled green paper strip, some vellum I scalloped, and sewing for the base of the photo area. It was a fluke that "so much love" showed at the bottom of the photo so I opted to keep it slightly longer to keep it rather than trim it to match the other three sides.
I created the title cutting "He picked" with my Cameo combined with those lovely Fancy Pants Designs alphas. I used my Cameo to cut some flowers from Just Nick's Girl Power and layered them over the O. I placed an enamel dot in the center to finish.
I scalloped another green marble strip and stitched it on the top. I added another flower cluster too.
For the corner embellishment area, I completed the visual triangle with a third flower cluster.
For the journaling spot, I opted to print it out. I used the font KG Always a Good Time to match the top part of my title. I added more scalloped paper, stitching, a cut tab from the striped paper, and another enamel dot.
Et voila!
Supply list: Cardstock: American Crafts; Patterned Paper: Crate Paper Hello Love; Alphas: Fancy Pants Designs; Electronic Cut File: JustNick; Punches: We R Memory Keepers; Enamel Dots: Pebbles, My Mind's Eye; Inks: Close to My Heart, Stazon; Adhesive: Scotch by 3M; Other: Vellum, Sequin
Thursday, February 25, 2016
Bust a Move -- Scrapping Our Stash Blog Hop
Hi everyone! Welcome, welcome. Grab some chocolate, and make sure you keep hopping after you check out my scrappy project! You should've arrived from Juliana's blog, but if you came here first, the full hop list is at the bottom.
So I opted to grab some Simple Stories "Rad" stash for today's project. It's such a wonderful collection (here's another layout I used Rad for)! Here's the full layout:
And here are some close ups!
I did some sewing, used the coordinating washi tape for my journaling, and used punched circles and the "New Bradz" for extra embellishment.
I used JustNick Studios' Handcut Letters to cut out "Bust" and popped up with foam tape. So fun!
I followed along with the February Paper Issues Sketchy Saturday for inspiration.
Now it's time to hop along to Monica's blog and project. Thanks so much for stopping by today!
So I opted to grab some Simple Stories "Rad" stash for today's project. It's such a wonderful collection (here's another layout I used Rad for)! Here's the full layout:
And here are some close ups!
I did some sewing, used the coordinating washi tape for my journaling, and used punched circles and the "New Bradz" for extra embellishment.
I used JustNick Studios' Handcut Letters to cut out "Bust" and popped up with foam tape. So fun!
I followed along with the February Paper Issues Sketchy Saturday for inspiration.
Now it's time to hop along to Monica's blog and project. Thanks so much for stopping by today!
Alison http://alisondaydesigns.com/
Juliana http://www.17turtles.com/
Monica http://scrapinspired.com
Wednesday, February 17, 2016
{We Are Better Together]
I opted to watercolor and stitch a heart behind the photo area instead of the circles shown in the sketch. I lightly traced a large heart to provide a guide for my watercoloring using Tim Holtz Distress Inks and a watercolor pen. Then I let it dry and stitched around it.
Tip: when using water on a layout, to prevent it from curling up, first lightly mist the back of the cardstock. On this layout, I didn't mist first, and it dried with a slight curl. After my layout was complete, I misted it on the back and lightly flattened it until it was flat again.
I subbed one of the photos in the sketch with the "love" journal card that I punched with a cross-stitch die (the Simple Stories collection uses a cross-stitch element so I brought it into the layout that way as well).
I used several of the patterned paper, so stickers, so chipboard elements to create the mat, and I used the coordinating alpha stickers for the title.
Next I decided the layout needed to be "grounded" so I created a border with a border sticker, some chipboard and cardstock hearts, and stitching.
Finally, I included the embellishment cluster on the top left instead of on the circle shown in the sketch.
Here is the sketch:
Thanks for stopping by! I'm so glad you could come visit, and I hope this inspired you to do something a little different with a sketch.
Majken
Thursday, February 4, 2016
Giveaway Winner! Scrapping Our Stash January Blog Hop
Hi everyone! I'm a couple of days late, but I thank you for your patience! Working full time, 2 kiddos, and a bathroom remodel can make a crafty mom crazy! If you didn't get a chance to hop along with us, it's definitely worth checking out the projects and how we used our ever-growing stashes. The full list can be found on the bottom of the My Whole World post.
Today's winner was chosen using random.org...and #4 wins! That's Karenladd - thank you Karen for following me on instagram and my blog!
Please email me at majkenmarie at yahoo dot com to claim your e-gift certificate! You have until midnight Central time on Friday night, Feb. 12, 2016 to claim your e-gift card.
Thanks so much for playing along! I hope to see you on the next blog hop...until then, chocolaty hugs!
Majken
Subscribe to:
Posts (Atom)