What you'll need:
- Laser printer (available at printing shops like Kinko's etc. if you don't have one; or purchase Minc toner sheets)
- Cardstock
- Silhouette digital cutting machine (I use a Cameo)
- Silhouette PixScan mat
- Silhouette Studio software
- Heidi Swapp Minc and transfer folder
- Foil
First I typed some words in different fonts and included some icons from an shape font to print out onto a sheet of 8 1/2" x 11" cardstock. I wanted "adventure" to complete my layout title but I didn't want to waste cardstock and I know I'll use the other icons somewhere so I added several to print!
The next step is putting the sheet on the PixScan mat and importing it into the Silhouette Studio software. Remember to take the photo as straight on as possible and in good lighting.
Tip: Mine gave me the error "cannot detect the PixScan markings" several times. After several takes, I rotated my mat 180 degrees so the arrow was pointing down like you see below, and it worked (I suspect a lighting issue). Below is the photo I used to import to Studio.
Note: it ignores everything outside the mat, so it's okay if other stuff is in the photo.
Note 2: Once you have a photo imported, it's very important to NOT remove the cardstock from the PixScan mat because it sees the images based on their position to the mat's registration marks.
Here is the photo after importing (it turns the mat arrow the correct way on its own):
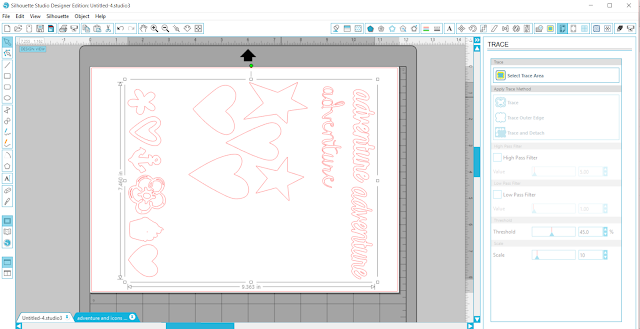
The next step is to trace the images. In this case, I turned High Pass Filter off and traced.
Next, I copied the red traced elements onto a new drawing area so I could zoom in and fix any trace errors by editing points, etc.
Once all of them were fixed, I created a slight internal offset for the full sheet, cleaned it up, and copied the traces back onto the PixScan mat drawing area.
Tip: The internal offset helps account for slight variations based on the photo of the images on the PixScan mat. If you'd rather have a border cut around your images, then you can create an external offset.
The next step is sending this to the Silhouette Cameo to cut. Once they are cut, they are ready for the Minc!
I took two "adventure" words, a heart, and the anchor to the transfer folder for my Minc. I turned my folder over to make sure all my pieces were covered with the gold foil.
Then run it through the Minc (I used setting 3).
The outcome? Foiled goodness!! And this fun layout.
I'd love to see what you create with your PixScan and Minc!
Thanks for sharing, pinning, and your feedback! Happy scrapping and crafting!
Majken


What a great way to combine these two wonderful machines!!! I love it! And now want my Deskjet to die (not really!!!)
ReplyDeleteHa! I agree - aren't these machines awesome?
Delete